

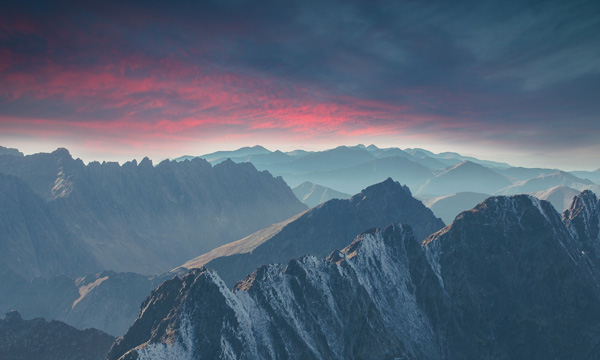
In this Photoshop tutorial, I’ll show you how to create a matte painting landscape of misty mountains. You’ll learn how to blend multiple mountain stocks into a cohesive scene, and create misty and hazy atmosphere. You’ll also learn how to create an afar view, creating lights from afar, adding depth to the scene and making the scene realistic and natural.
Tutorial Resources
Preparing Background
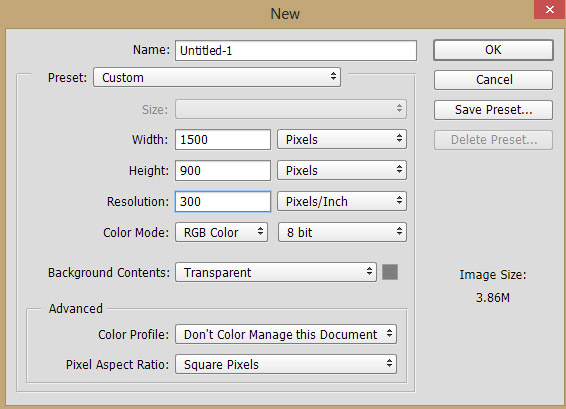
Step 1
Start by creating a new document by selecting File > New and enter the following settings:
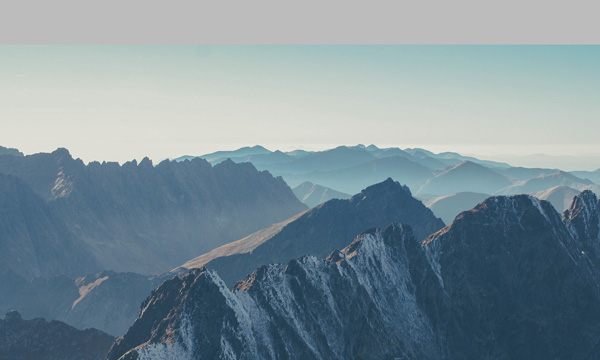
Add the Mountain 1
Step 2
Place the mountain 1 image to main document by selecting File > Place Embedded. Try to keep some space from top of the document while placing the mountain 1.
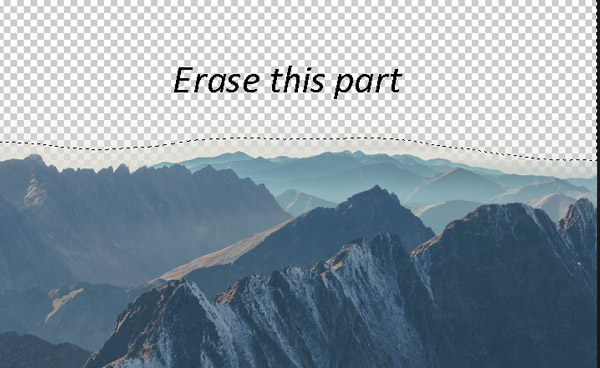
Step 3
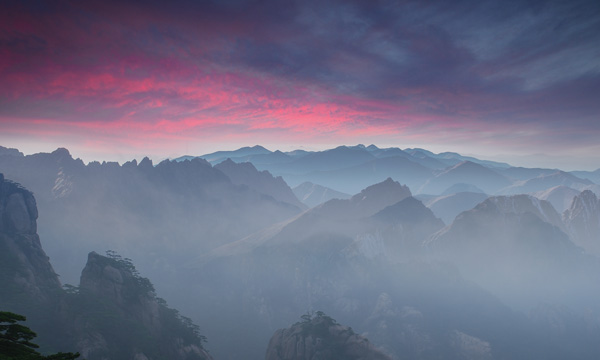
Click the second icon at the bottom of layer panel and add a Layer Mask to mountain 1. Activate the Brush Tool(B). Now using a soft black brush hide the upper parts and remember to leave some parts on the horizon area. This will help us to better blend the sky with mountains.
Here is the image for reference:
Add the Sky
Place the lake image to main document and place it under the mountain 1. Use the Transform Tool (CTRL + T) to enlarge it and make it fit with the mountains.
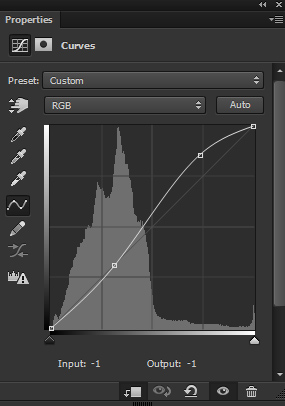
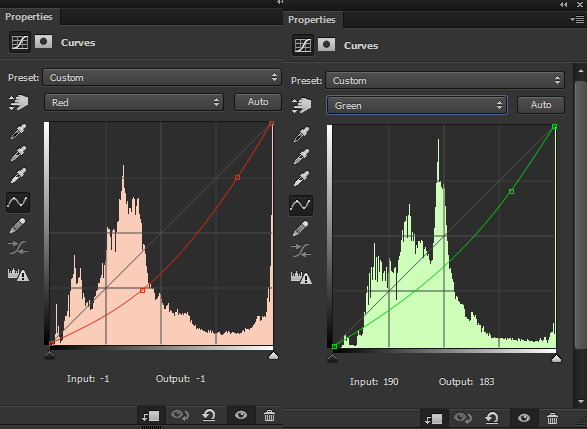
Step 4
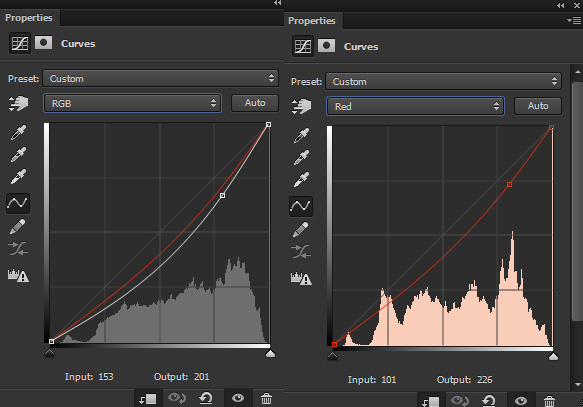
Use the Curves adjustment layer to increase the contrast of sky. Go to Layer > New Adjustment Layer > Curves and use the following settings :
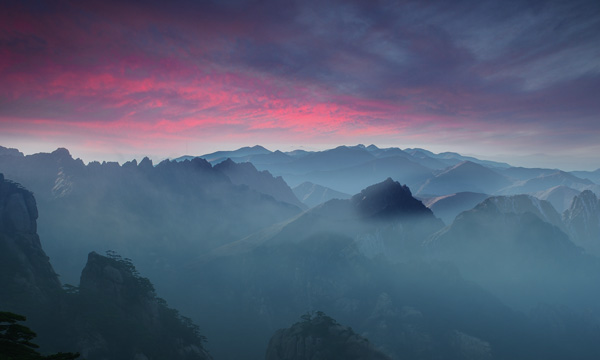
Results:

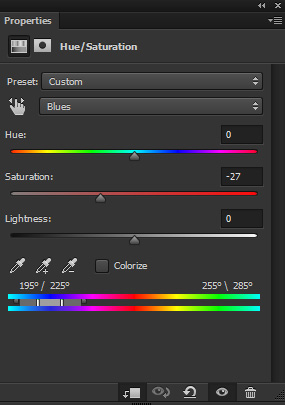
Step 5
Use the Hue/Saturation adjustment layer and reduce the blue tones from the sky (little bit).
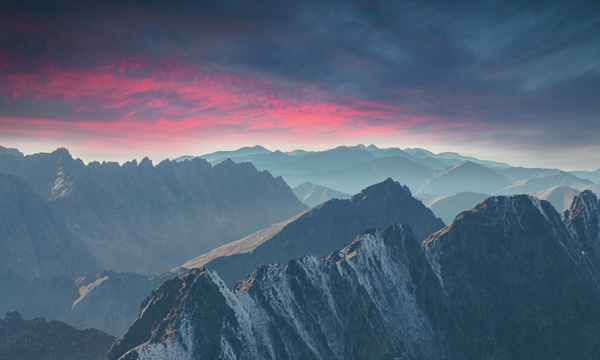
Results:
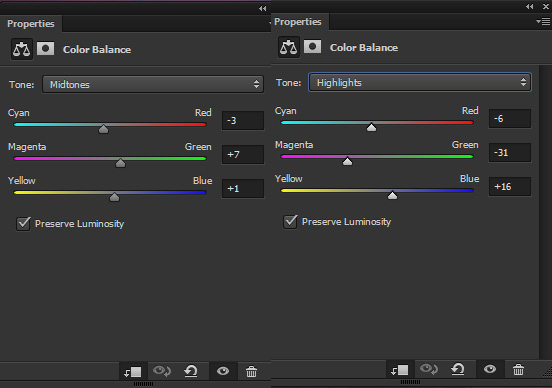
Step 6
Use the Color Balance to enhance the colors of sky. Only the change the values of Midtones and Highlights.
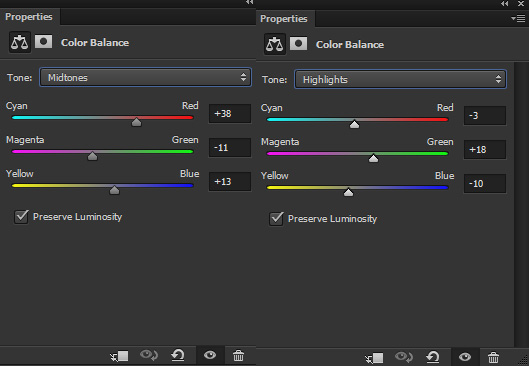
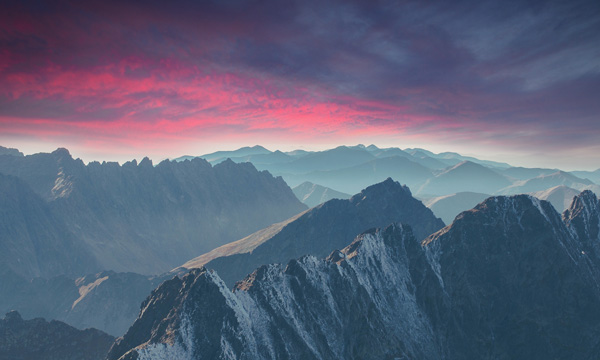
Results:
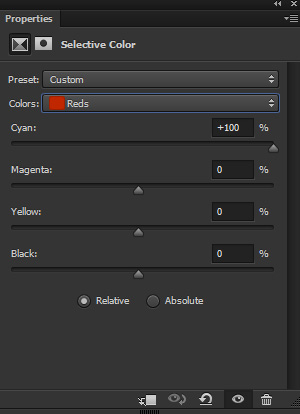
Step 7
You may notice that we’ve increased highlights on the red parts of the sky. To fix this, use the Selective Color adjustment layer and choose the Red color and decrease the highlights.
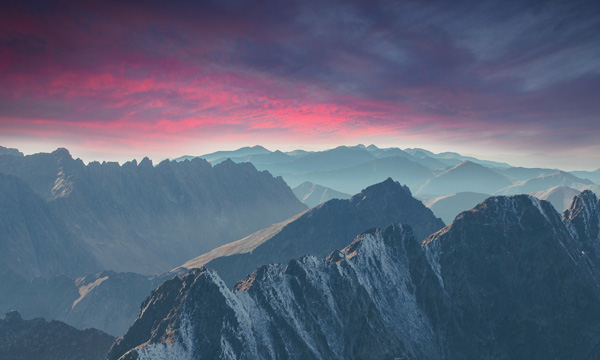
Results:
Step 8
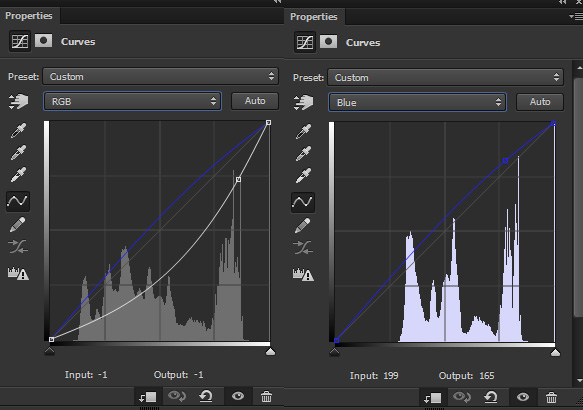
Now head back to mountain 1. Make a Curves adjustment layer for mountain 1 and use it as clipping mask. Now the reduce the brightness on highlights and add blue tones to mountain 1 using Blue channel.
Results:
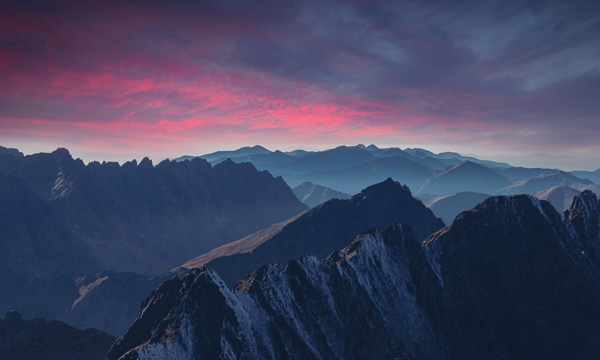
Add the Mountain 2
Step 9
Place the mountain 2 to main document and place it as shown below.
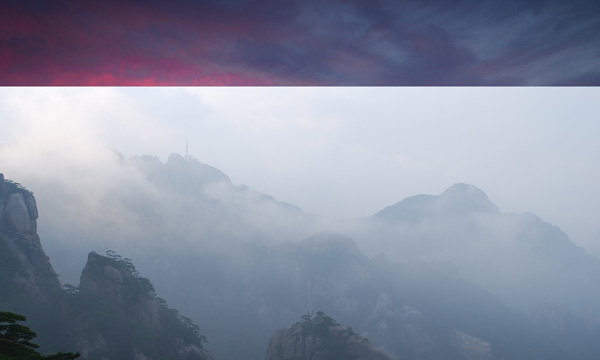
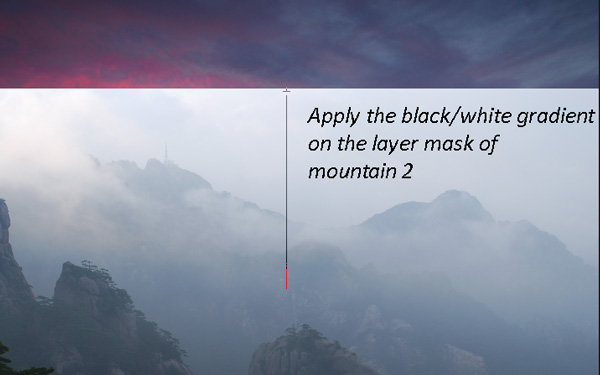
Step 10
Add a mask to mountain 2. Activate the Gradient Tool (G) and choose a Black/White gradient in the gradient editor. Now apply the gradient vertically (hold down shift key) from top to half of it, on the layer mask of mountain 2. For detail explanation on this trick, refer to our Misty Forest Tutorial.
Result with added mist to scene:
Results on layer mask:
Step 11
You can clearly notice that many parts of mountain 2 are not blended properly as indicated by white arrows. We need to fix them.
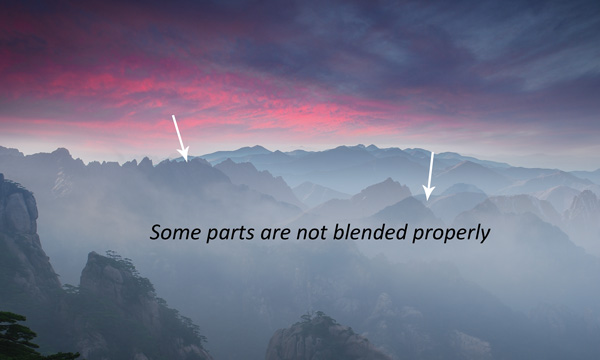
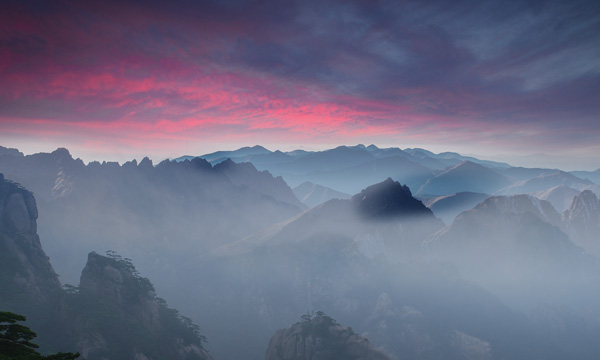
First, hide the part of mountain 2 indicated by the arrow. Use a soft round black brush to hide the parts. Remember that do not hide the other part and just hide only those as indicated by the arrows. I know that there are a lot of parts that needed to be fixed, but we’ll fix them later. Once you hide them, the results should resemble below image:
Step 12
Make a Curves adjustment layer for mountain 2 and don’t forget to use it as Clipping Mask. Now decrease the brightness and also, add cyan color tones using Red channel.
Results :
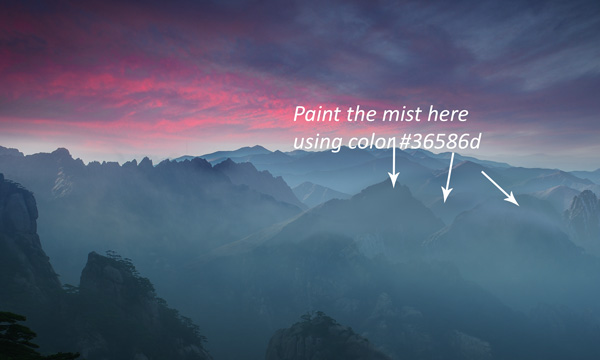
Step 13
Create a new layer and name it ‘mist 1’. Change your foreground color to #36586d. Use a soft round brush to paint some mist on the indicated part and cover up the mountain 1 parts with mist. Here are the results after painting mist :
Create the Light Effects
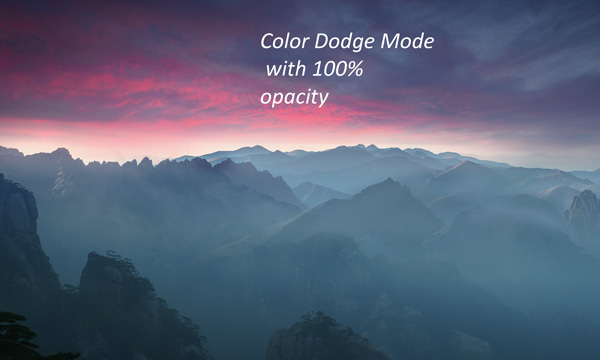
Step 14
Let’s move ahead and now we will create the light effect for the scene. Create a new layer and name it ‘light 1’. Set the foreground color to #5c4334 and paint the lights on the horizon area using soft round brush. I did not paint light on the right side because this area is too far from our light source and will be less illuminated by the light source as well.

Change the blend mode to Color Dodge.
Step 15
Create a new layer and name it ‘light 2’. Use the same color to paint a light source as shown in below image.
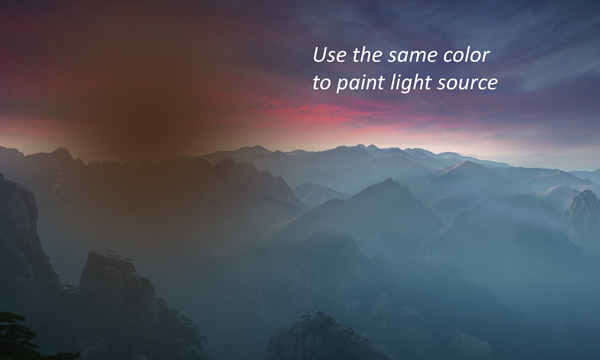
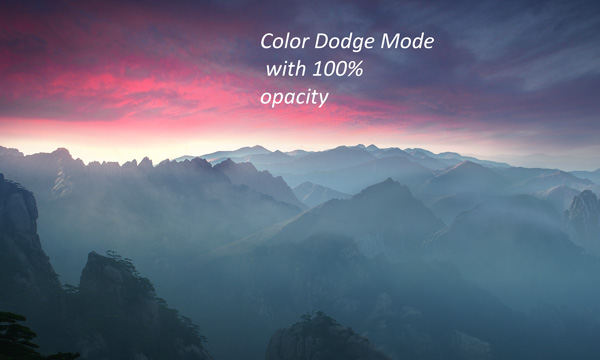
Change the blend mode to Color Dodge.
Step 16
Create a new layer and name it ‘light 3’. This time we’ll paint the reflection of lights on the mountains. So using the same color paint the light reflection on the mountains as shown in below image.
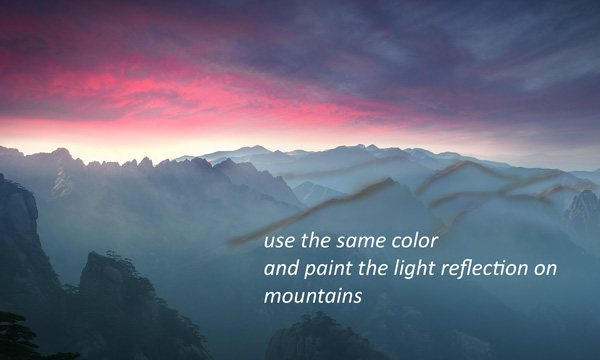
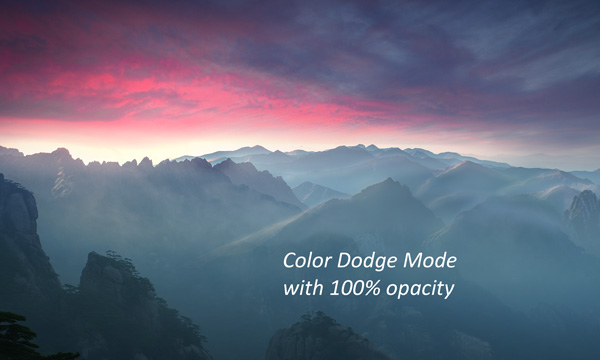
Change the blend mode to Color Dodge. Here are the results with glowing light on mountains :
Add the Mountain 3
Step 17
Open up the mountain 3 and extract it from background using Selection Techniques. Place it to the right side of the scene.
Step 18
Make a Curves adjustment layer to mountain 3 and reduce the brightness.
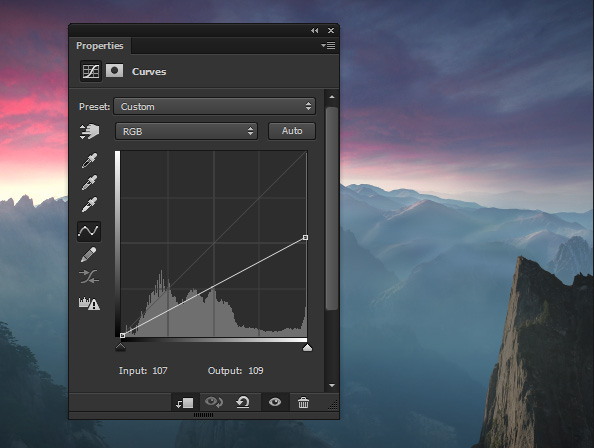
On the layer mask of Curves, use a soft round black brush to erase the effect on the front parts and maintain light there.
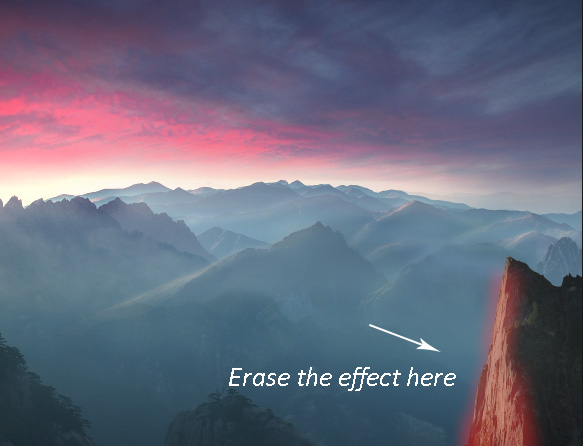
Results:
Step 19
Make a Color Balance adjustment layer and match the color of mountain 3 with the background.
Add the Foliage
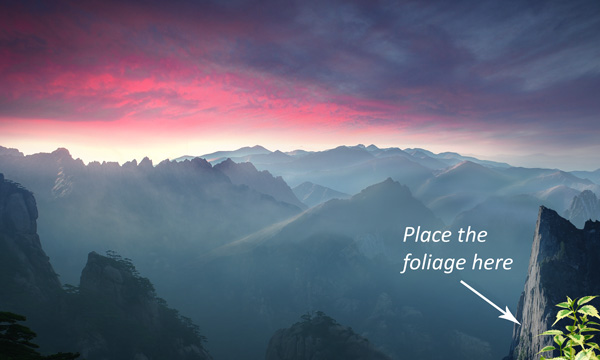
Step 20
Open the foliage pack and choose Foliage 6_angle 2 then place it at bottom right corner.
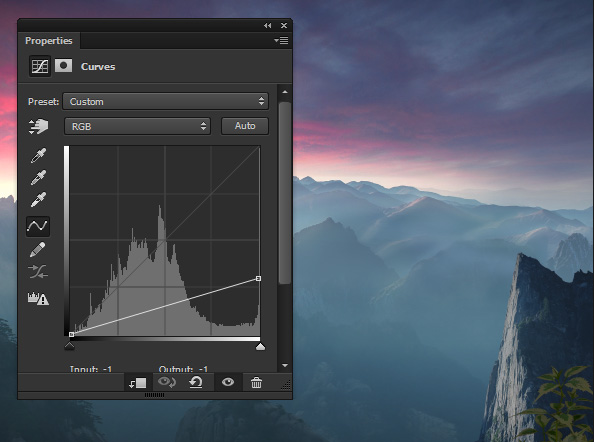
Step 21
Make a Curves adjustment layer to reduce its brightness.
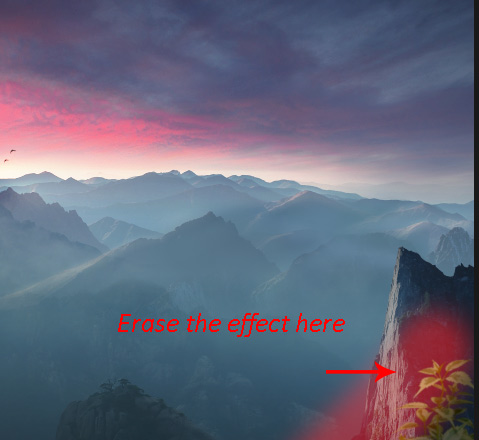
Step 22
Erase the effect of Curves on the front parts and strengthen the shade to back parts. Hide the effect on the layer mask of Curves.
Results:

Step 23
Make a Curves adjustment layer again and this time use Red and Green channel to add colors to foliage.
Results:

Step 24
Continue coloring it using Color Balance adjustment layer. Only alter the values of Midtones and Highlights.
Results:
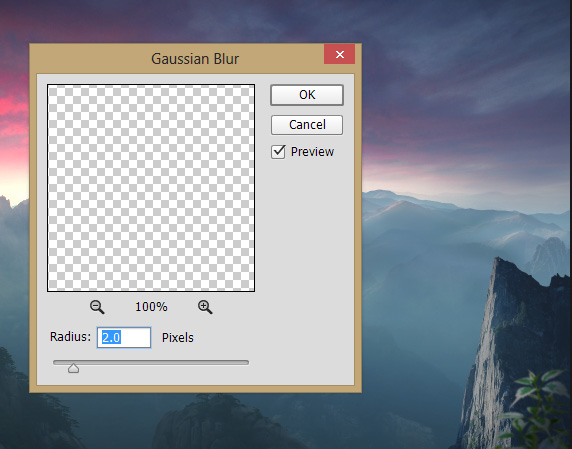
Step 25
Convert the foliage layer into Smart Objects. Go to Filter > Blur > Gaussian Blur and set the radius value to 2px and apply the blur effect to foliage.
Create a new layer and name it ‘mist 2’. Set the foreground color to #36586d. Now paint the mist over the mountain 3 and foliage.
Add the Lens Flare
Step 26
Open up the lens flare pack and choose the OpticalFlare26 then place it as shown below. We’ll use it to create the light which is coming out from horizon area, so place it exactly there.
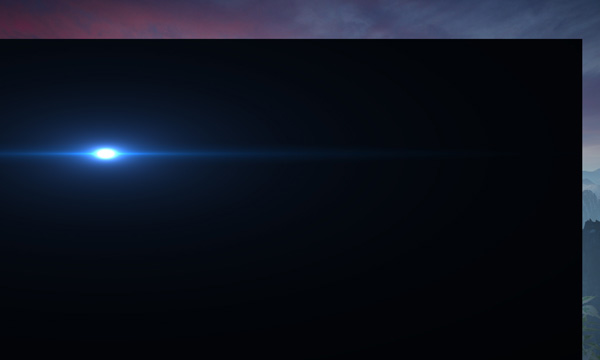
Change the blend mode to Screen and reduce the opacity to 60%.
Step 27
Use the Hue/Saturation adjustment layer to colorize the lens flare.

Results:
Step 28
You may notice that the hard edges of lens flare are still visible. To get rid of them, make a Level adjustment layer to lens flare and drag the black slider to the right as shown in below image.
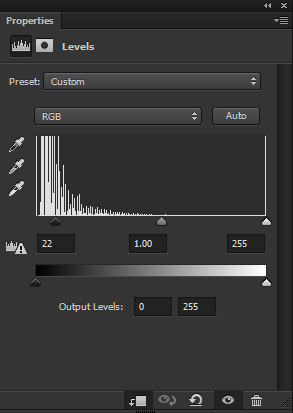
Results:
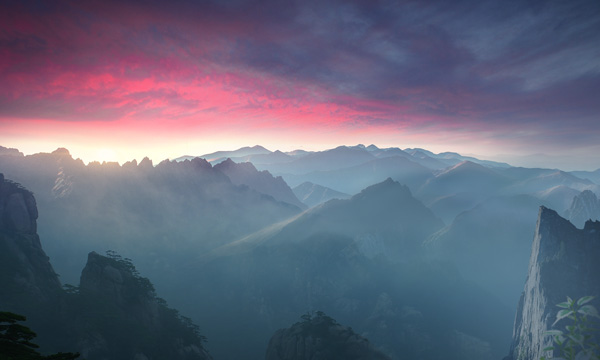
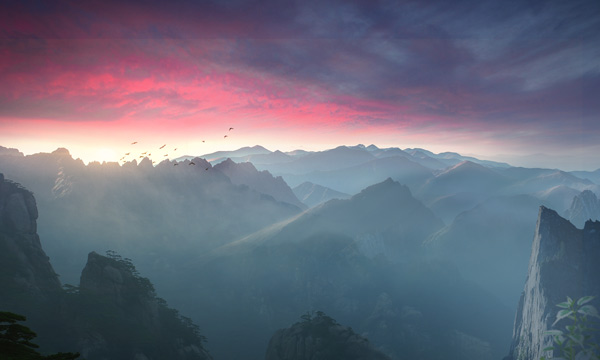
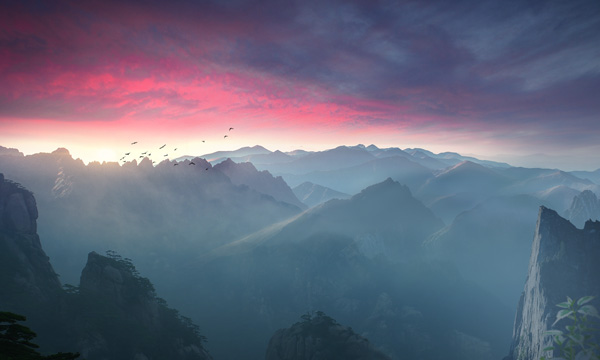
Step 29
Use the birds brushes to paint some birds and feel free to use any birds brush.
Final Adjustments
Step 30
Make a Brightness/Contrast and increase the contrast of whole scene.
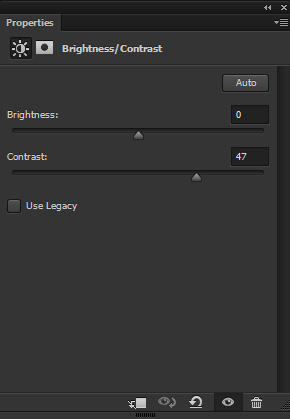
Reduce the opacity to 56%. Here are the results with increased contrast:
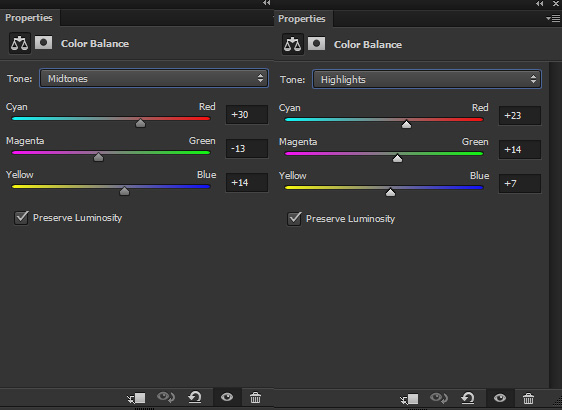
Step 31
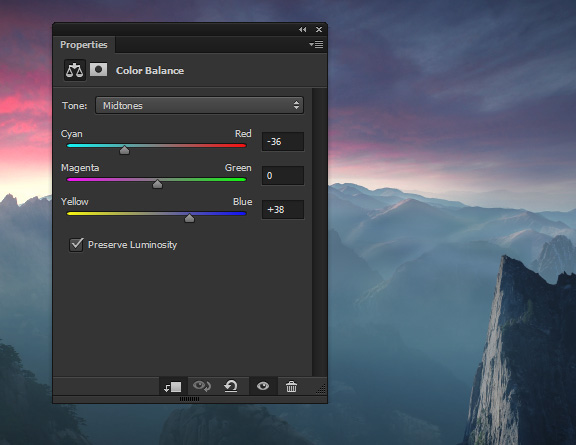
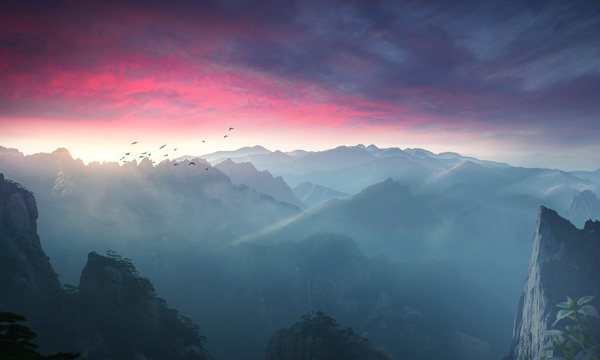
Add a Color Balance adjustment layer and colorize the whole scene. Only change the values of Midtones and Highlights.
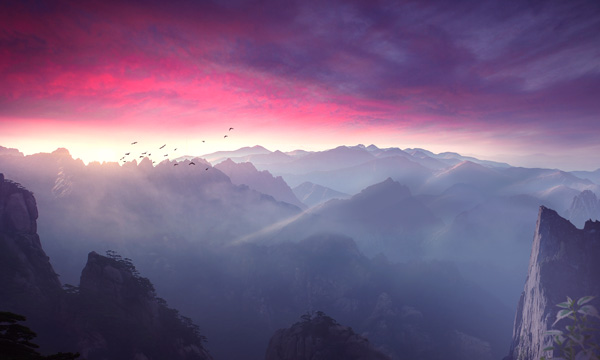
Results:
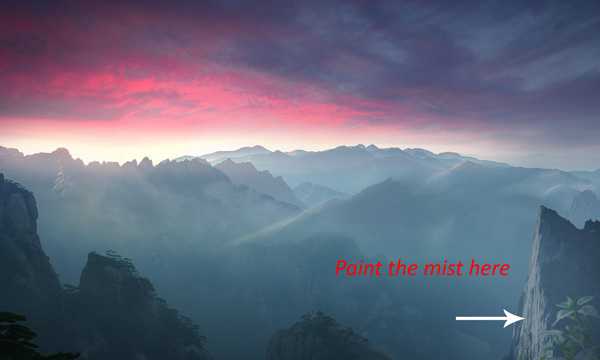
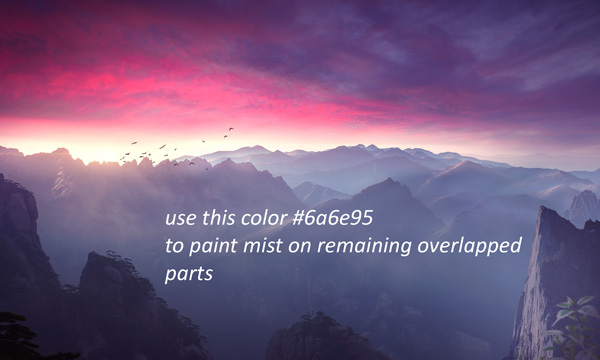
Step 32
As we all know that matte painting is heavily depends on details. If you zoom in then you’ll find a lot of parts of the mountain 2 that are overlapping with mountain 1 as indicated by arrows. To fix this, we need to paint the mist over them.
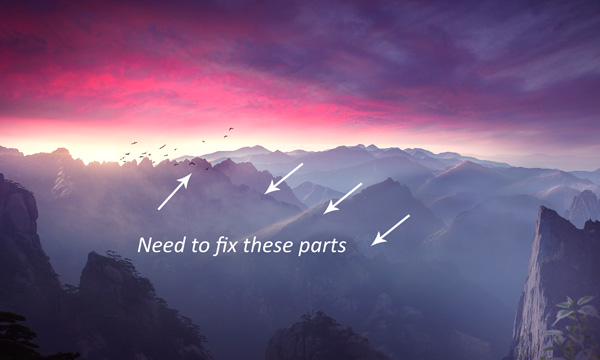
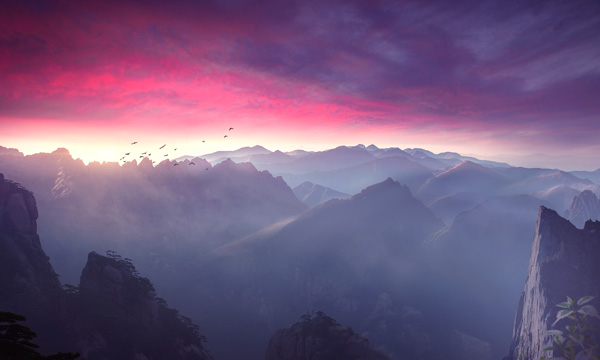
Create a new layer on top of all layers and name it ‘final mist’. Set the foreground to #6a6e95 or sample the color from the scene. Use a soft basic brush to paint the mist over these areas. Do it patiently otherwise, you can ruin the results and don’t overdo it, if so then try to reduce the opacity. For better results, you can use more than one layer to paint the mist. Here are the results after painting mist:
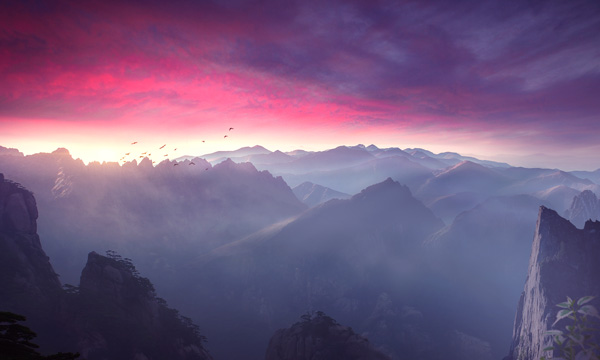
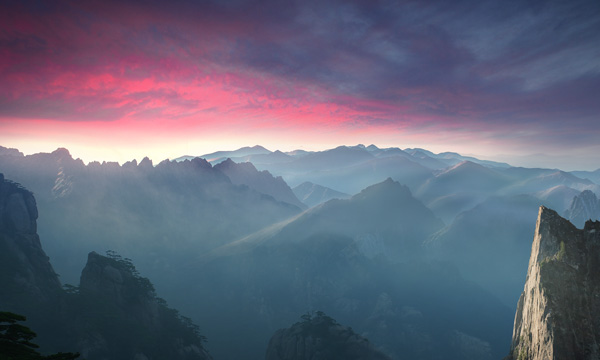
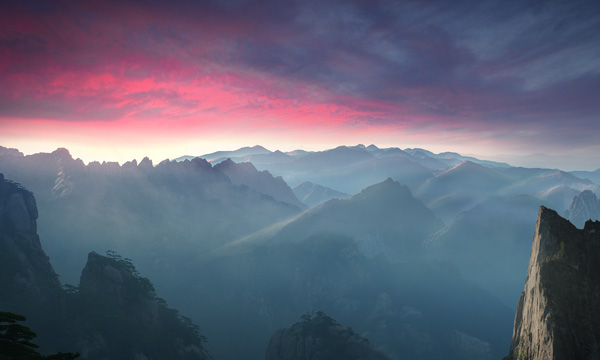
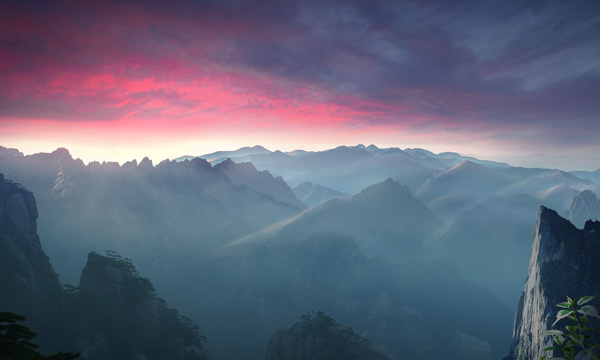
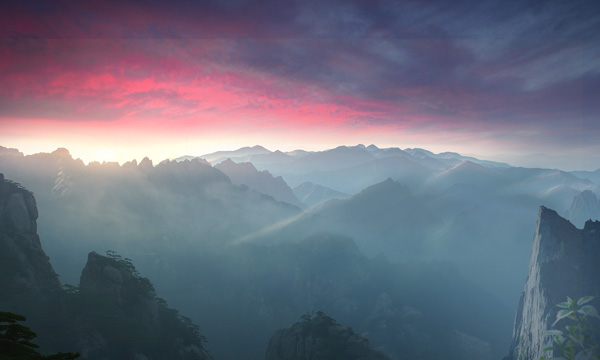
Final Results:
Conclusion
Thanks for following the tutorial. Hope you like it and love to welcome your thoughts and feedback on the tutorial. Have a great day!
Need Help With Photoshop or Looking for Professional Support?
Whether you're just getting started with Photoshop or need expert-level assistance, we're here to help! Contact us for personalized Photoshop tutorials, project support, or creative services.
Get in touch today to take your skills or projects to the next level.
CONTACT US NOW📘 Want to Master Photoshop Faster?
🎁 Get Your FREE PDF E-Book "Top 10 Photoshop Tricks Every Designer Must Know" Now – Packed with expert tips, shortcuts, and techniques to boost your creativity & workflow.
👉 Download Your FREE PDF E-Book NOW!
