
How Layers Work
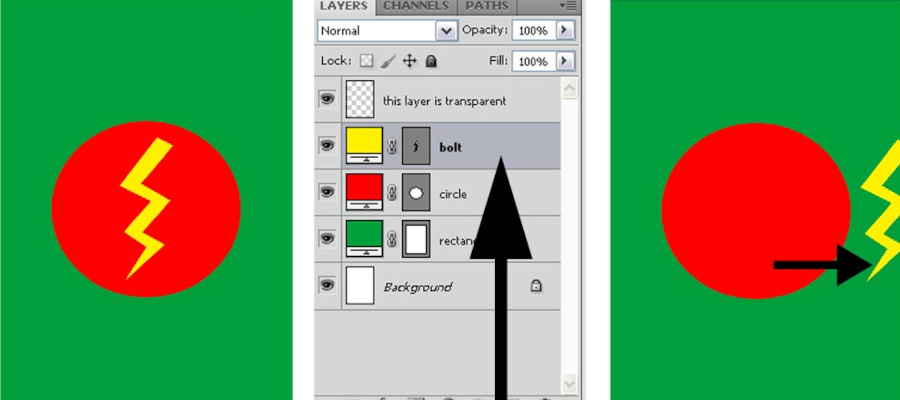
It’s all about layers in photoshop. Without them, Photoshop just wouldn’t be Photoshop. I’m sure you must have used Paint before, and I’m sure you have trouble editing a certain portion of the image without ‘disturbing’ the surrounding areas. This is where layers come in. You can select anywhere on the document window, and edit, but only the layer which you selected will be edited. Very versatile and flexible. Take for example, look at the figure below, say if we wanted to move the yellow lightning bolt, but do not want to disturb the other shapes, we simply select the bolt layer and click on the Move tool (or press V) to move it. Very simple! You sure can’t do that with Paint.

But with this comes a simple problem that new users encounter. Many times they forget to select the layer that they want to edit, and they try to edit that layer while the selection is on another layer. So either nothing happens (so they think because they are looking at the image they are editing), or another image gets edited, and they get frustrated. Always, always remember to look at the layers before editing! To label a layer, simply double click on the layer name to change it.
Layers are also called layers for a reason. How your final image appears will depend on how your layers are stacked, or placed. The top layer will always be at the top of the ‘stack’, while the bottom will always be at the bottom, meaning it will get covered by any layer that’s above it.

Let’s take a look at the example. You can see that the shapes appear in the order they are layered. If the circle layer was to be dragged to above the bolt, then we would not be able to see the bolt anymore, as the circle would have covered it. Similarly, if we drag the green rectangle layer all the way to the top, all we would see is just a green background. That’s because the rectangle has covered all the other layers. The top layer, as you can see, has a white and gray checked icon box, which basically tells you that it is transparent. Hence it doesn’t matter if it is at the top or bottom, it doesn’t affect the image, until you add some pixels onto it. Just for explaining purposes, I made the layers with grey shades so you can get a better idea of how layers work, but in reality, your layers won’t have those gray areas, so don’t worry!
Another common problem related to this for new users is this, sometimes when you paste or insert some text, you don’t see anything appear. There’s a high chance that the layer is below another layer which is bigger than it, hence covering it and making it as if it was never pasted or inserted. Simply just drag the layer all the way up to the top to see it! So once again, check the layers if you know you correctly inserted a new layer but it doesn’t appear.
Multiple Layers at the same time
Another thing about layers is that you can click multiple layers at one time, just like any file in windows. You may hold shift and select a ‘start’ layer and ‘end’ layer, where it will select all layers in that range, or if you want to manually select them, hold ctrl and click on those layers you want. The cool thing is that, with multiple layers selected, you can do one action (not all) and it will apply to all of them.
One common example is if you have a nice collage of pictures in their proper grids, but you want to move them to another section of the canvas. If you drag each picture one by one, you not only waste time, but you have to re-align all of them to your desired grid again. Simply select all of the layers that you want to move, then click move (or press V), and move the whole grid! You will notice that when multiple layers are selected, you can do many things but there are some things you can’t do. For example, the blending modes will be grayed out, as you can see from the example. So will the locks, layer effects and layer mask. You can still change opacity, fill, show/hide, etc.

Merging Layers
Merging layers basically mean you combining 2 or more existing layers into one new layer. Like for example if you have drawn up a face, and all its parts like eyes, nose, ears and so on are all on different layers. To make it convenient and easy, we can just merge all of them into one layer, and label it as ‘Face’. Now when you edit the ‘Face’ layer or move it, all of the parts gets edited or moved too! It’s a very handy tool but make sure you don’t have to edit any image in the merged layer individually as once it is merged, there’s no way to ‘un-merge’ it except by going to the History palette and ‘Undo’.
If you right click a layer, you will also see Merge Down, Merge Visible and Flatten image.
- Merge down merges selected layer with layer below
- Merge visible will merge all layers that are visible (remember the eye? Show/Hide icon) will ignore layers that are not visible.
- Flatten merges all layers into one layer. If you have layers not visible it will ask you if you want to do away with them.
- To duplicate a layer, just right click a layer and click ‘Duplicate Layer’ or press Ctrl+J or Cmd+J.
Layers Palette Interface

Blending mode: Changes the way the layers interact with each other, the best thing to do is play around with them so you get an idea of what each does.
Type Layer: The same as an image layer, except this layer contains text that can be edited, meaning you can change its font, font size, color, spacing, etc.
Layer Effects (Styles): Special effects applied to your image layer. See the ‘fx’ by the right? Each effect will be listed. I’m using the Stroke effect right now, multiple effects may be used at once.
Group: In this example, you can see that I’ve made a group, titled “shapes”. Basically groups or folders increase your efficiency and makes life easier for you, as well as keeping your layers organized. Imagine if you’re working with many layers, like 30, and that’s not hard to achieve. If you don’t use groups, there’s going to be a lot of scrolling up and down to do to find your layers.
Also, groups keep them organized so you know where each layer is. When you select the group ‘layer’, you are selecting all of the layers within the group in essence. So if you move the group, all the layers in it move. If you hide it, they all disappear. So groups are really a useful tool to help with your layer experience.

Show/Hide Icon: See the eye on the left column? If you click it once, it hides that layer, like how the green rectangle has disappeared. Click it again and it shows. Useful for anything and everything, like if you don’t want a particular layer to show but also don’t want to delete it just in case you might need it again, simply hide it! Or if you’re deciding on which font to use, simply create all the fonts and just show/hide each of them right off the bat!
Background: Always locked, cannot be moved or have layer effects applied to it. The little icon of the padlock on the right, indicates it is locked. Double click on it to change it to a normal layer.
Layer opacity: Adjusts how transparent each layer is. 0 is completely transparent, 100 is completely opaque.
Layer fill: Adjusts the fill of the layer content. Somewhat similar to layer opacity, but layer opacity affects the whole layer including effects and filters, but layer fill only affects the contents.
Lock all: If the box is checked the layer is totally protected from any editing.
Lock Position: You cannot move this layer but can still edit it.
Lock Image pixels: You cannot draw on this layer if it is locked.
Lock transparent: You can paint on this layer but not where it is transparent.
Delete: Will delete an entire layer. Either Drag the thumbnail to the icon or select the layer and click on the trash can (delete icon).
New Layer: Click to add a new blank layer. Or drag an existing layer thumbnail to create a duplicate.
New Adjustment layer: Allows non-destructive adjustment of colors to a layer. (Can be undone anytime, even after closing document)
Create Group: Allows you to organize your layers into groups, as explained earlier on.
Layer mask: Allows you to paint away parts of your layer without damaging your original image.
Layer styles: Special effects for your layers.
Linking layers: By linking two or more layers or layer sets, you can move their contents together. You can also copy, paste, align, merge, apply transformations to, and create clipping groups from linked layers.
Need Help With Photoshop or Looking for Professional Support?
Whether you're just getting started with Photoshop or need expert-level assistance, we're here to help! Contact us for personalized Photoshop tutorials, project support, or creative services.
Get in touch today to take your skills or projects to the next level.
CONTACT US NOW📘 Want to Master Photoshop Faster?
🎁 Get Your FREE PDF E-Book "Top 10 Photoshop Tricks Every Designer Must Know" Now – Packed with expert tips, shortcuts, and techniques to boost your creativity & workflow.
👉 Download Your FREE PDF E-Book NOW!