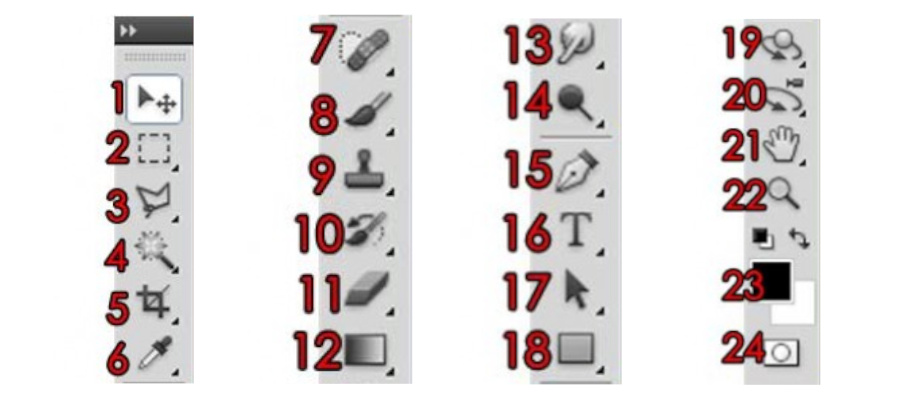


I have labeled everything in the above picture for your easy reference. Just as a reminder, if you see a small black arrow at the bottom right corner of the icon, it simply means you can hold it for more options to choose a different tool. Now let’s take a more in-depth look at each tool. You won’t be using ALL of the tools, in fact, only a very select few you will use for most of the time. It’s good to know what each tool does, however I will only be covering the basic functions and not every single tool. For further tips and use, please check out the tutorial section.
1. Selection Tool.

You will be using this all the time, basically to move selections, objections and layers.
![]() Make sure the layer is highlighted, as shown in Fig. X. Even if I click the square but my highlighted layer is the green arrow, then when I try to move the square, only the arrow will move instead. This rule applies to everything in Photoshop, so remember this! If you try to edit an object and nothing is happening, always check to see if that layer is highlighted first! If you don’t see a ‘Layers’ window, press F7 or go to the top, Windows > Layers.
Make sure the layer is highlighted, as shown in Fig. X. Even if I click the square but my highlighted layer is the green arrow, then when I try to move the square, only the arrow will move instead. This rule applies to everything in Photoshop, so remember this! If you try to edit an object and nothing is happening, always check to see if that layer is highlighted first! If you don’t see a ‘Layers’ window, press F7 or go to the top, Windows > Layers.
2. Marquee Tools
Used for making selections. You can use it to make selections for copying, cutting, deleting, fillings, etc. Useful for trimming unwanted edges of photos because scaling them down will change the size, or even objects. Click here for more info.
3. Lasso Tools

To make irregular selections, for example, selecting a T-shirt. Polygonal Lasso lets you make multiple dots (like join-the-dots kinda thing) so you can make more precise selections if you’re using a mouse, as compared to the Lasso. The magnetic lasso simply attempts to automatically follow edges of objects.
4. The Magic Wand
The Magic Wand is one of Photoshop’s most powerful and useful tools, and it’s important you get to know how to use this efficiently. Basically, at whichever area of an object or selection you click, it will identify that pixel color and select areas of similar color, depending on your magic wand settings.
5. Crop/Slice
 The Crop tool is self-explanatory. It allows you to redefine an active image area, like for example if you only want the cute hamster. Simply use the crop tool, and drag the area that you want to crop out. After that press enter and all done.

The Slice tool allows you to divide an image into smaller sections which fit together like a jigsaw (but with straight edges). There are two tools: Slice (which creates the slices) and Slice Select (which enables you to select and modify existing slices). Sliced images are commonly used for web design work, to make ‘buttons’ with links to external URLs, etc. You will almost never need to use this, so don’t worry too much about it.
6. General info Tools
Yup I self-named them general info tools, cos I didn’t know what else to name them. They basically have no editing functions but help you tremendously in your editing experience.
Eyedropper Tool
Defines the background/foreground color. Click anywhere on a picture and the foreground will change to that color. Hold alt and click to change background color. Useful for changing colors to a specific color of something in the picture you want but you don’t know what color is it.
Color Sampler Tool
Color Sampler Tool allows you to view color values in defined spots of your image. You can set up to 4 color samplers on your image. Just click on the parts you want to sample colors, and the marks will appear, with their color information at the information panel (press F8). Samplers get saved in your image, so you can know color values in defined spots even after you reopen the image. You won’t be using much of this too, at least for most of the casual photoshop users out there.
Ruler Tool
The ruler tool simply measures the distance and angles in the work area. More useful for actual print outs that you will be doing, for eg brochures, name cards, etc, so you can measure and foresee accurately.
Notes Tool
Notes tool are basically just like Post-it notes, for you to make small notes for your own reference.

Count Tool
The Count tool, originally designed to help cytologists to count cells in microphotos, puts a readable number down on the photo each time you click your mouse on a subject. It’s very valuable for determining things like how many white cells are in a blood sample, how many trees in a forest photo, or how many students are in a class photo. As you can see, there are 28 scouts in the photo. Simple, but very helpful.
7. Healing Tools
As the name goes, healing tools ‘heal’ your picture. They retouch images using sampled pixels or pattern, and in the case of content-aware, it tries to predict what the pixel colors should be based on its surroundings. Also used to handle blemishes in red eye.
8. Brush/Pencil
Used for drawing and outlining. Not really great when paired with a mouse, so use a tablet for better effects. Try googling for WACOM tablets if you are thinking of buying one. But nonetheless, still essential in any graphics editing software, even with a mouse. Not much to explain here, just adjust your brush size, color, and other settings and you’re good to go. One more thing, you can download custom brushes from the internet to get some awesome effects, for example, smoke brushes give you nice smoke effects, and flame brushes and so on.
9. Clone Tools
To clone images. Just select a source starting point on the area you want to clone (Alt+click to define a start point) and paint somewhere else that you want to clone.
10. History Tools
History brush allows you to paint using a history state or a snapshot as a source.
11. Eraser Tools
The eraser, erases of course. Need I say more?
The background eraser clears the background layer to transparency.
The magic eraser, yep you guessed it, got its name from the Magic Wand, and clears the areas of similar pixel color of which you selected.
12. Fill Tools
The paint bucket should be no surprise to many people, especially Paint users. Click an area to fill the area with foreground color or pattern.
The gradient tool allows you to make a gradient or a ‘fade’ over objects.
13. Blur/Sharpen/Smudge Tool
The blur tool blurs an image area, the sharpen tool sharpens an image area, and the smudge tool mixes and spreads content of image areas. All results are highly dependent on their settings like strength, brush size and blending mode. Play around for different effects!
14.Dodge/Burn/Sponge Tool
The dodge tool lightens up an image area, while the burn tool darkens. The sponge tool saturates or desaturates, depending on your settings at the top. Similarly for dodge and burn tools, you can choose the range to adjust too, shadows, midtones or highlights.

15. Vector Tools
The Pen Tools are used to create clear shapes and paths which can be used as vector objects that can be scaled to any size. Honestly, I don’t use them a lot, and still struggle at using them. It takes a lot of practice to use them efficiently.
16. Text Tools
Another commonly used tool, the Text tool allows you to type text. You can type horizontally or vertically. After selecting the text tool, you can click once on the canvas to show your text as it types, or simply drag a text box, and then type in it.
17. Pathing Tools
The Path Selection Tool and Direct Selection Tool selects and moves (fragments of) existing path’s / vector shape mask’s segments / anchor points. Does not work on rasterized layers.
18. Shapes Tools
Used to make various shapes, lines, and artwork like symbols and designs found under custom-shapes.
19. & 20. 3D Object Tools
Okay, these tools are for editing 3D objects only. You will need 3D models to play with, and the first way and maybe the most known way to work with a 3D layer in Photoshop is creating a 3D layer from an existing file. For this go to 3D > New Layer from 3D File, then chose a file on your file system and open it. Photoshop allows you to open .3DS, .DAE, .KMZ, .U3D and .OBJ files. However, I have never worked with 3D before so I’ll be honest, I’ve never used these tools before, so I won’t go into these, and I’m sure you won’t need to either. If you already into 3D designing, then chances are you already know how to use these tools and should not be reading this beginner’s guide.
21. Hand/Rotate Tools
Hand Tool allows you drag an image around for better viewing, similar to as you would in a pdf file.

Rotate view tool allows the user to rotate the image, with the angle being stated at the top. But it’s only rotating it ON SCREEN. The actual image will NOT be rotated. It will still save upright, print upright and export upright. Which also means everything you do now will be at an angle, be it your shapes, or text, because we’re operating in a rotated view. If you’re painting inside an image, this will help you to get into certain areas so that you can paint easily. Also another tip is if you’re trying to gauge the angle for a crooked image to be straightened, you can always use this to preview the angle first before rotating the image. If you get the error shown, here are the steps to solve it.
Enable OpenGL and optimize GPU settings
OpenGL is a software and hardware standard that accelerates video processing when working with large or complex images such as 3D files. OpenGL requires a video adapter that supports the OpenGL standard. Your performance when opening, moving, and editing 3D models is significantly improved on a system with OpenGL. (If OpenGL is not available on your system, Photoshop uses software-based ray-trace rendering to display 3D files.)
If OpenGL is present on your system, you can enable it in the Preferences dialog box.
Do one of the following:
(Windows) Choose Edit > Preferences > Performance.
(Mac OS) Choose Photoshop > Preferences > Performance.
In the GPU Settings section, select Enable OpenGL Drawing.
Click OK. The preference affects subsequently opened images. No restart is necessary.
22. Zoom Tool
To zoom. Really. But I don’t really use this. I prefer to hold down the Alt key and scroll up (zoom in) or down (zoom out) with my mousewheel.
23. Foreground / Background Color
A foreground color and background color can be set to be used to paint and fill objects with, color backgrounds, color text, and more. This view provides an easy way to see what colors are currently selected, and you can also easily swap the colors by clicking the double arrow button.
Quick Tip: Pressing D resets the foreground and background colors to black and white respectively.
24. Standard / Quick Mask mode
Standard mode is simply the default or normal mode where you edit in.
The Quick Mask mode is just a very versatile way to select things. Instead of creating marquees as you do with the other tools, or making selections with lassos of which you might need to spend a long time going round the edges of an image, especially an irregular object (eg clothes), you can “paint” the selection using any of Photoshop’s painting tools. You can even use the other selection tools on the Quick Mask, as if it was a regular image.
Need Help With Photoshop or Looking for Professional Support?
Whether you're just getting started with Photoshop or need expert-level assistance, we're here to help! Contact us for personalized Photoshop tutorials, project support, or creative services.
Get in touch today to take your skills or projects to the next level.
CONTACT US NOW📘 Want to Master Photoshop Faster?
🎁 Get Your FREE PDF E-Book "Top 10 Photoshop Tricks Every Designer Must Know" Now – Packed with expert tips, shortcuts, and techniques to boost your creativity & workflow.
👉 Download Your FREE PDF E-Book NOW!