
Underexposed & Overexposed images happen with everyone, but that doesn’t mean these shots doesn’t worth it at all. Sometimes these images can be the best shots of your career if you fix them in post-production.
In this tutorial, you’ll learn how to fix exposure in Lightroom. You’ll learn how to use Lightroom tools to fix exposure of any image, understanding underexposed and overexposed images, what is a perfect exposure and the difference between Raw & JPEG images. Let’s get into it.
RAW Vs JPEG
Shooting a photo with RAW & JPEG has a lot of difference as far as the details/information is concerned.
RAW Image is unprocessed and contains all the raw data/information of a photo. Think about raw and unprocessed food that has not processed yet. It contains a lot of nutritional value than any processed food. Raw images are the same as the freshly come out camera and ready to be processed in the post-production process.
Also, Raw images are bigger files that require more memory spaces in your camera.
JPEG image is a processed image than RAW images. They don’t contain a lot of information as Raw images. You can take JPEG images as processed foods.
JPEG images are small files, doesn’t require a large memory storage.
Step 1 – Perfect Exposure
Before you start digging the tutorial, let’s learn the basics of exposure. Exposure is the amount of light that can be found in your images once you have captured them through your cameras. It is also the light that reaches your camera sensor.
A perfect exposure image always has a balanced light amount as far as the shadows (dark areas) and the highlights (bright areas) of the image is concerned. In a perfect exposure image, you’ll find the image not too dark, or not too bright.
You’ll have an equal amount of light in a perfect exposure image. You might call it an HDR image as well.
Getting the perfect exposure in your images also depends on how you capture your images with your Camera. It usually involves three factors Aperture, Shutter Speed and using ISO. It is also called exposure triangle in exposure photography.
Step 2 – Underexposed & Overexposed Images
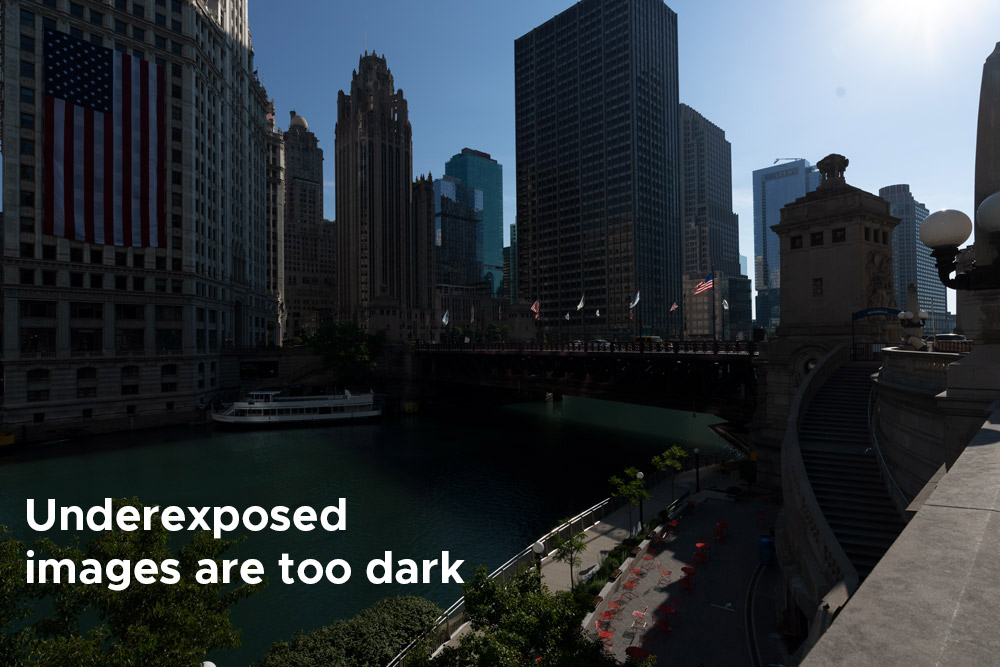
An underexposed is too dark as you can see in the image below. It doesn’t contain much information in shadows (shadows are always crunchy or dark) but does capture a lot of info in highlights of any image.
Take a look at the example of the underexposed image:
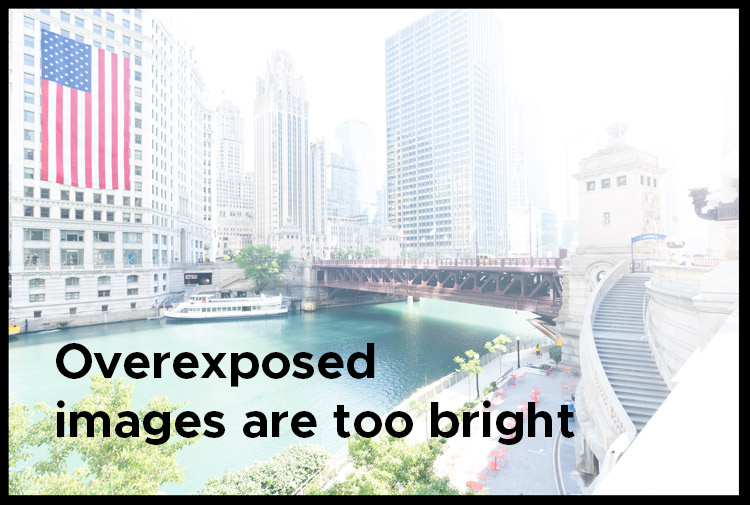
An Overexposed image is too bright as you can see in the image below. It doesn’t contain much information in highlights (highlights are always blown out – see the sky) but does have a lot of info in the shadows of any image.
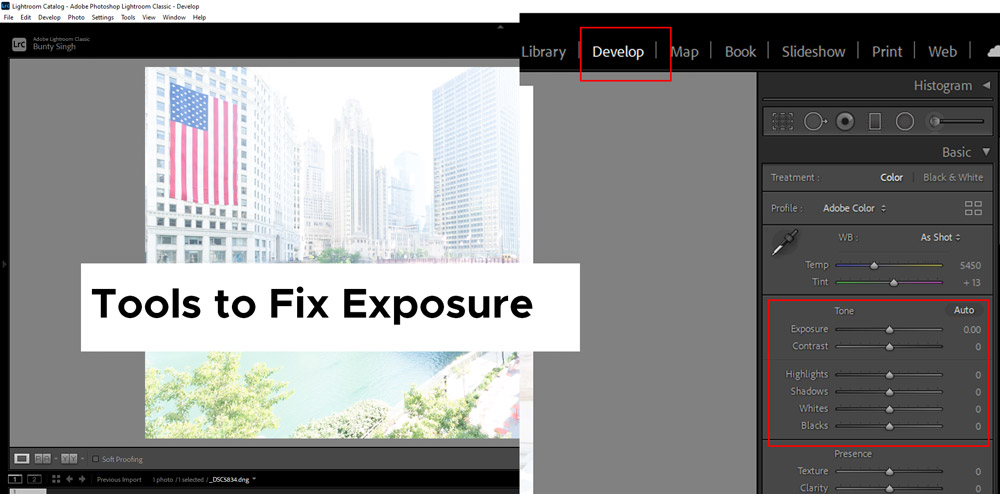
Step 3 – Lightroom Tools To Correct Exposure
The Lightroom Basic Panel in the Develop Module has enough tools to correct the exposure of any image.
You can go to the Develop Module and in the Basic Panel, you’ll find Exposure, Highlights, Shadows, and Whites slider to fix the exposure.
Exposure controls the overall brightness of a photo.
Highlights controls the brighter areas of a photo.
Shadows controls the darker areas of a photo.
Whites & Blacks control the white and black point of a photo. Both of these affect the image overall and are more sensitive than Highlights & Shadows sliders.
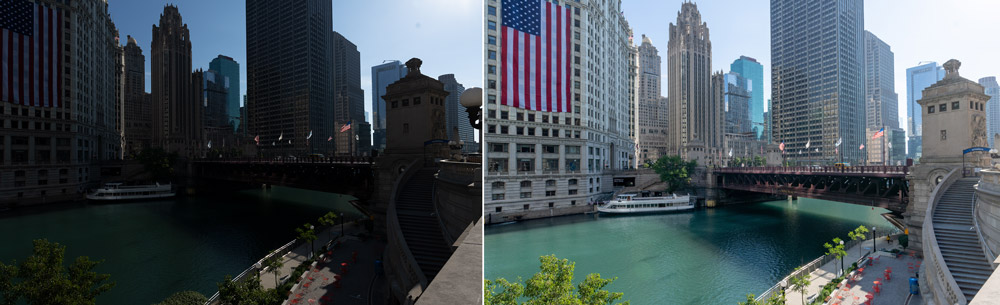
Step 4 – Fixing Overexposed Images
As you know an overexposed photo is too bright as you can see in the image below.
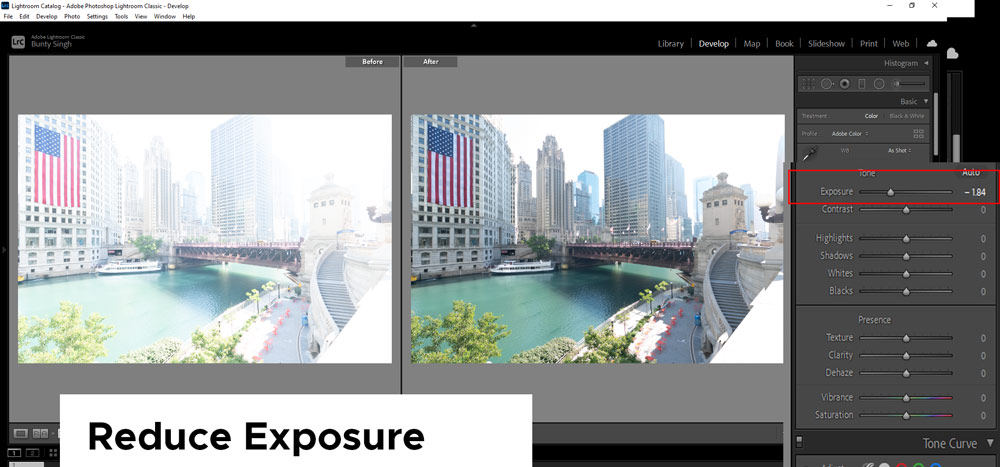
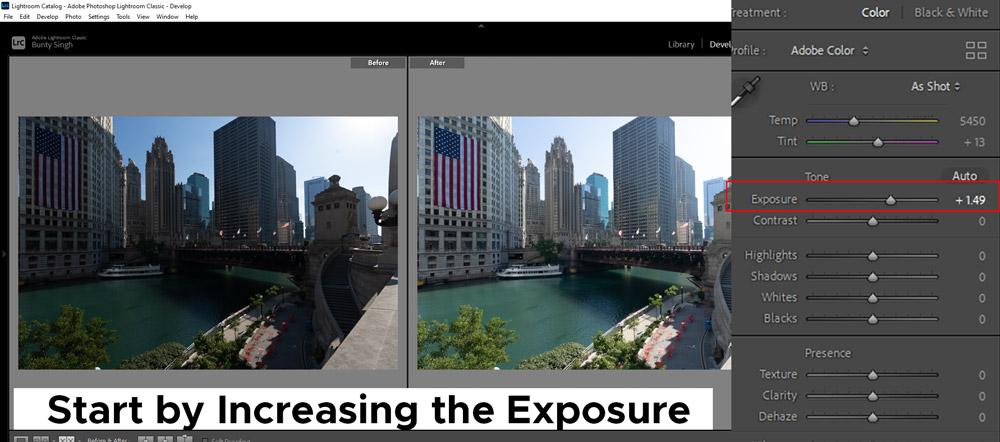
If the image is overexposed overall, then you can start with the Exposure slider. If not, you can try reducing the Highlights and Whites slider.
Since the whole image is overexposed, I’ll start with reducing the Exposure down to fix the exposure of the photo.
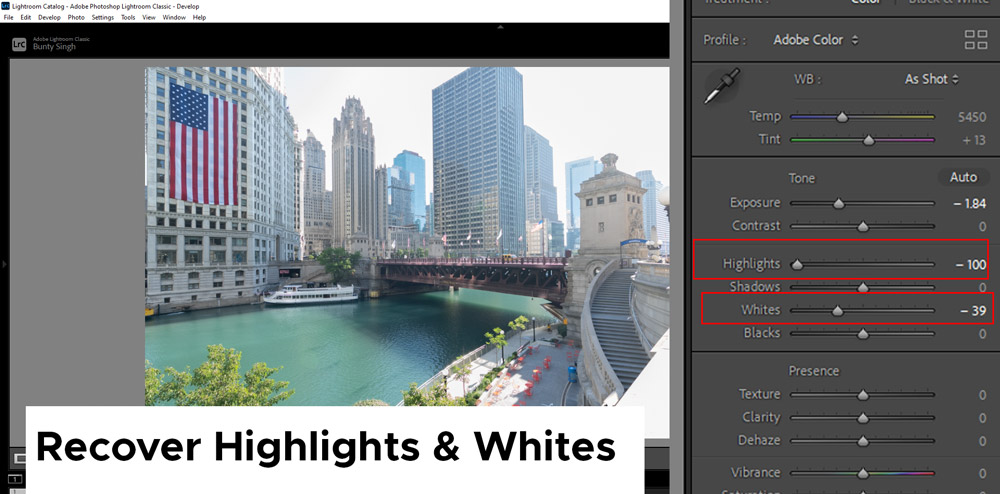
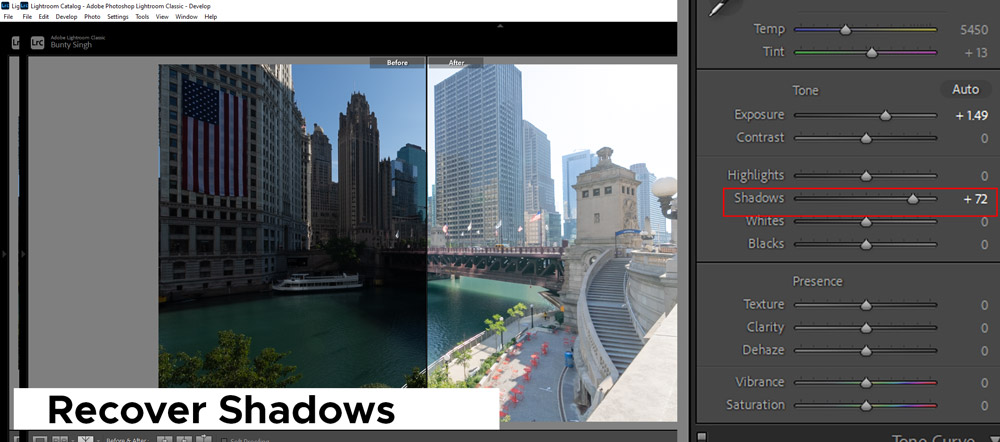
After that, you can reduce the Highlights slider all the way to the left to recover highlights of the image. This slider is not sensitive that’s why I moved it all the way to the left.
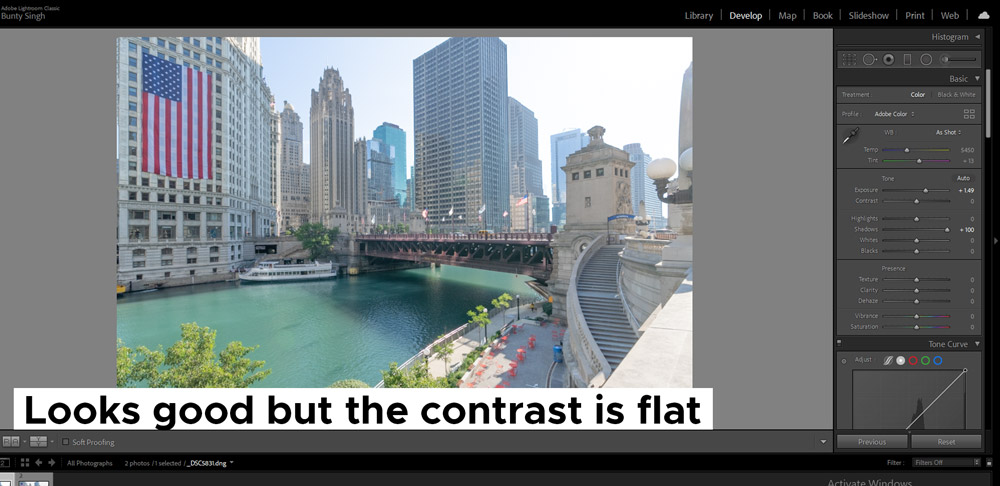
You can play around with the Whites slider to recover more information from highlights. But be careful as this slider is sensitive and can do harm to your images if not used carefully.
Play around with it.
Here you can see we have fixed the overexposed photo:
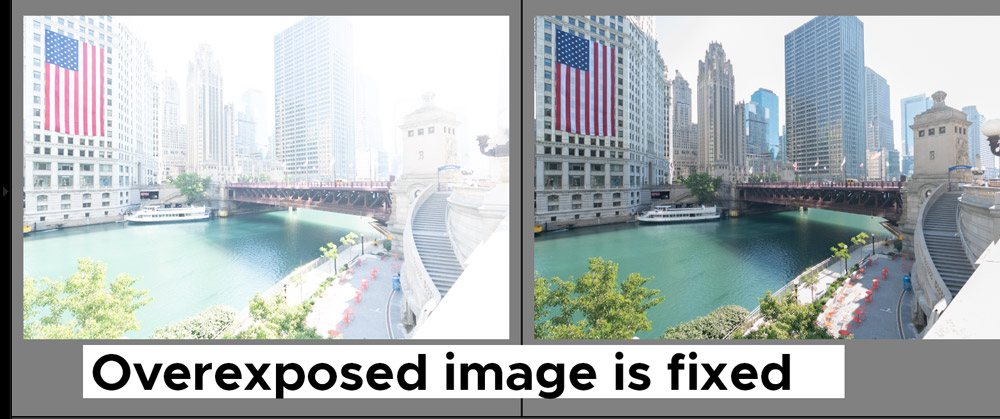
Notice the structure of the buildings has a lot of details now.
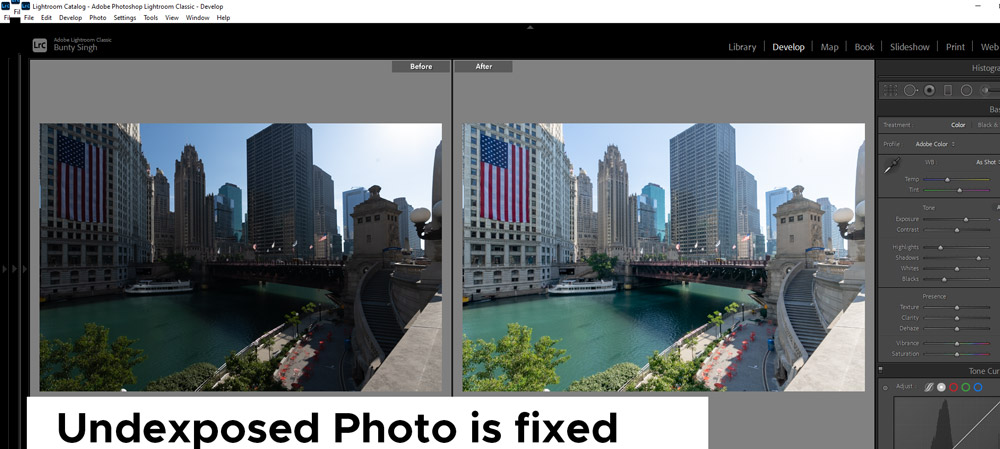
Step 5 – Fixing Underexposed Images
Fixing an underexposed is a bit tricky as we have to fix the contrast of the image as well. Sometimes recovering shadows’ info does give a lot of data but it can make the contrast of the image plain and flat by reducing it.
Again, you can see the image is underexposed overall, I am going with the Exposure slider pulling it up slowly to the point where I start seeing the recovery of details in the shadows.
Just like the Highlights slider, the Shadows slider is also not sensitive and helps you bring out details in shadows. Increase it to recover details from the dark areas of the image.
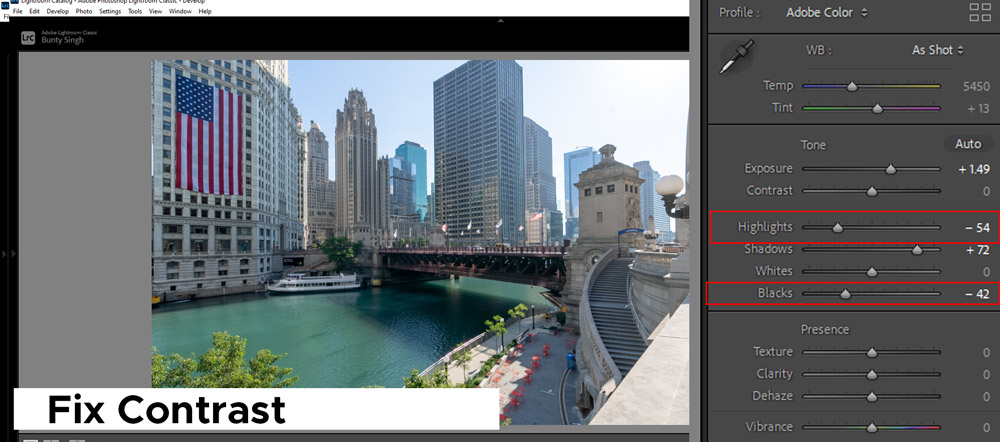
Step 6 – Fixing Contrast
As you can see that we have fixed the underexposed photo but the contrast looks plain and it has decreased a bit.
To increase the contrast, I have reduced the Blacks to crunch shadows a bit or make them darker so I can remove the plain contrast in the image.
Also, I have reduced the highlights this is just to make sure that I don’t lose any details in highlights. Usually, in the underexposed images, highlights are balanced, and since we increased the exposure that affects the image whole, we might have lost some info in highlights.
Here you can see we have fixed the underexposed image:
I hope you enjoyed the tutorial. Now you have a great understanding of underexposed and overexposed images. If you have questions or feedback, please comment below in the comment section.
Need Help With Photoshop or Looking for Professional Support?
Whether you're just getting started with Photoshop or need expert-level assistance, we're here to help! Contact us for personalized Photoshop tutorials, project support, or creative services.
Get in touch today to take your skills or projects to the next level.
CONTACT US NOW📘 Want to Master Photoshop Faster?
🎁 Get Your FREE PDF E-Book "Top 10 Photoshop Tricks Every Designer Must Know" Now – Packed with expert tips, shortcuts, and techniques to boost your creativity & workflow.
👉 Download Your FREE PDF E-Book NOW!