I’m sure you have wondered how designers put their designs on T-shirt/models before, or you might have needed to do a mock-up T-shirt design to submit for your class Tee. In this tutorial, I’ll be showing you how easy it is to put your artwork on T-shirts with Photoshop.
Preparation:
Of course you need to have your T-shirt design all ready! You may design your artwork in Photoshop as a normal image file (meaning without actually designing it on the T-shirt itself). Transferring the design over to the T-shirt is another step, which is what this tutorial is about. Remember to use a high resolution for your actual artwork file as you need a high quality to have a good print. Resolution of 300px/inch usually is good enough. (When creating a new document, under Resolution set to 300 pixels/inch)
This tutorial was done on Adobe Photoshop CS5. Other versions may vary slightly.
If your artwork is within the front part of the shirt:
Step 1:
First you need either a plain T-shirt on its own, or a ‘model’ wearing a plain T-shirt. You can simply search for those images online (make sure they are free for personal use or get permission), or you can simply take a photo of a person wearing a plain shirt. Open that image up in Photoshop. Duplicate it by right-clicking on the layer and Duplicate Layer as a safety measure.
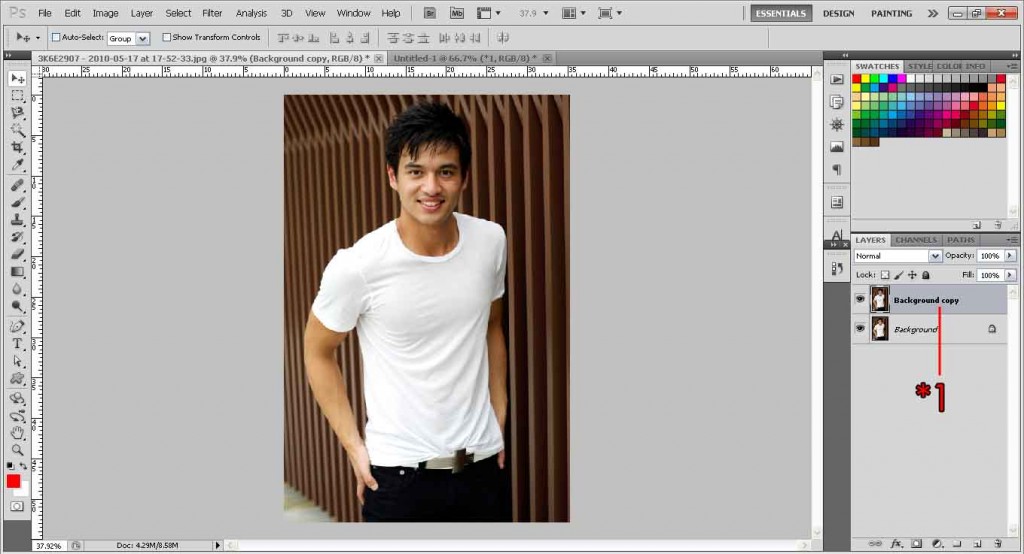
Step 2:
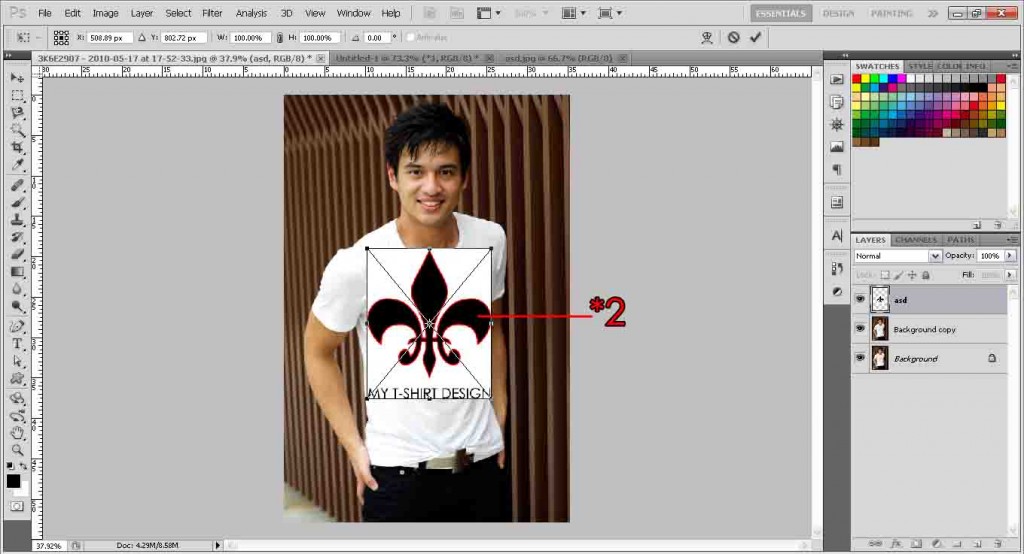
Next, open up your T-shirt artwork by dragging the file onto the model or shirt, or go to Menu Bar: File > Place > select artwork. Scale your image to the size you want (NOTE: It is important to know the limits of your printer, or the budgeted cost of your T-shirt. Some printers do not print larger than A4 size, while those who do will naturally charge a higher price).
Hold shift while dragging to keep it in proportion. I have made a simple design just for illustration purposes. As this part of the tutorial is for designs which fit in nicely at the front of the shirt, I will size it smaller. If you wish to have your designs bigger and overlapping the seams, please scroll to the second part of the tutorial.
Step 3:
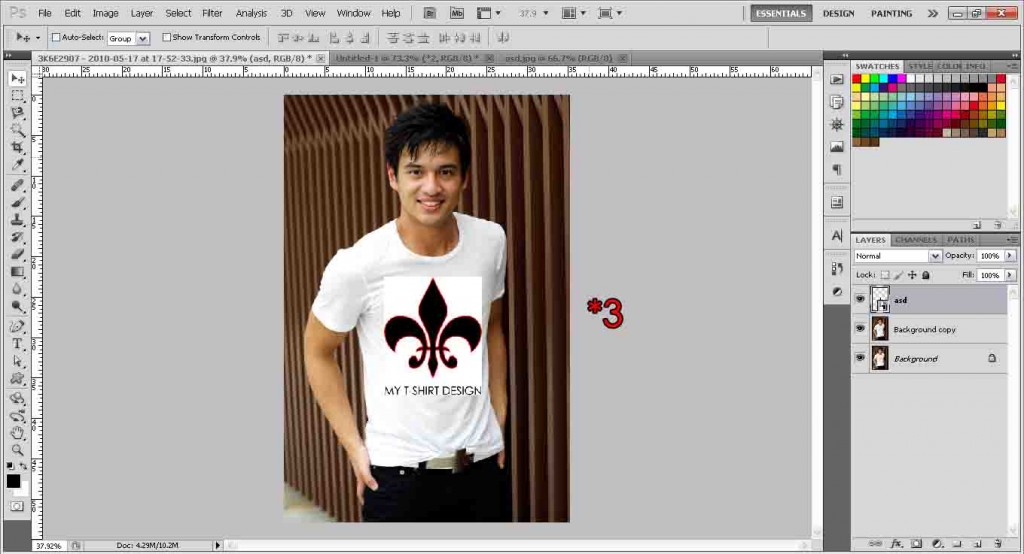
You should see something like that. But you’re thinking, what about that ugly white background around the artwork? Well, that’s where blending mode comes in.
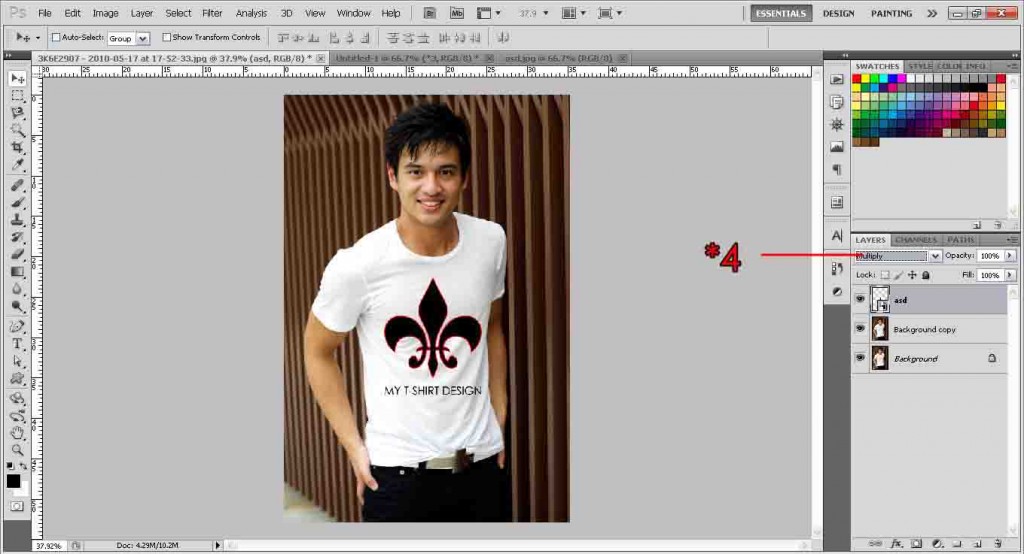
Step 4:
Simply change the blending mode to Multiply and you will see how the background disappears like magic! Note: Multiply only works for dark images on light backgrounds. If you have a bright image on a dark background (eg, a red artwork on a black shirt), you will notice your design will simply turn black, or becomes very dark. For light colors on dark backgrounds, use the Lighten or Screen blending mode. In fact, try out all the different blending modes to see what different effects you get!
Step 5:
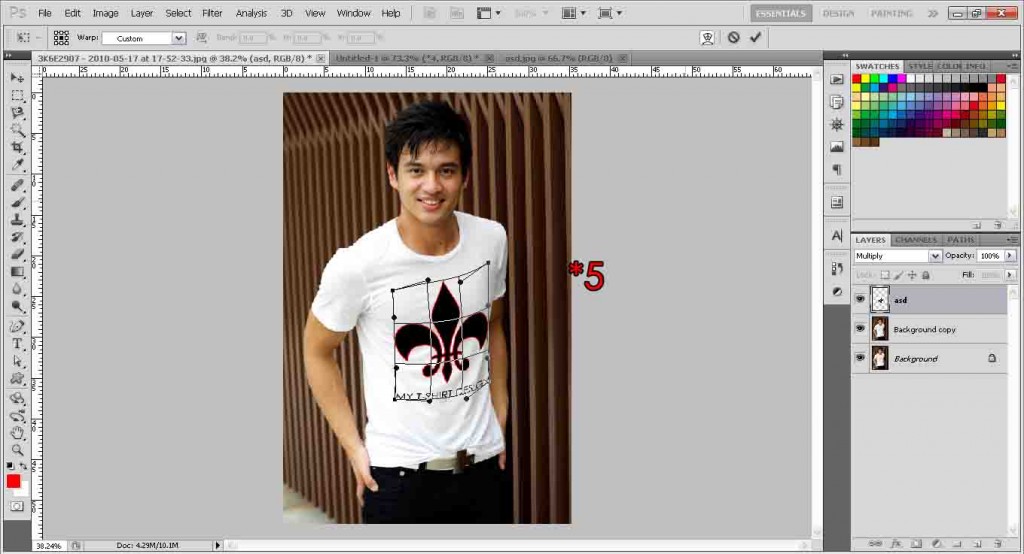
Depending on how your model or shirt is, your picture may be ready. Especially if the model is facing straight at you, or it’s just a plain shirt. However I chose to use a slightly tilted example to illustrate how you can make your artwork look more realistic on a person. First, I move my artwork to the center of the shirt (it depends where you want your artwork to be of course, but I’ll be putting it in the center). Then go to Menu Bar: Edit > Transform > Warp. Simply pull and stretch the corners and the grids, and make the image look like how it would if it was on a shirt. I can’t really teach you how to use the Warp, there is no right or wrong method. Just play around with it and you’ll get the hang of it in no time! Play with the dots, the lines and the grids.
Step 6:
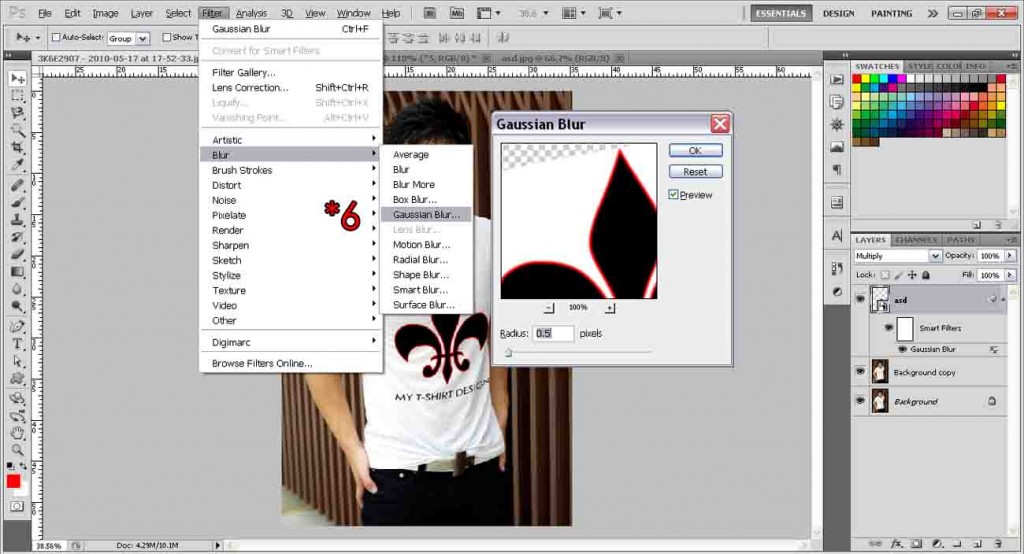
Finally, add a Gaussian blur to make it look more natural. Go to Menu Bar: Filter > Blur > Gaussian Blur. Put 0.5 px at the radius. Hit OK.
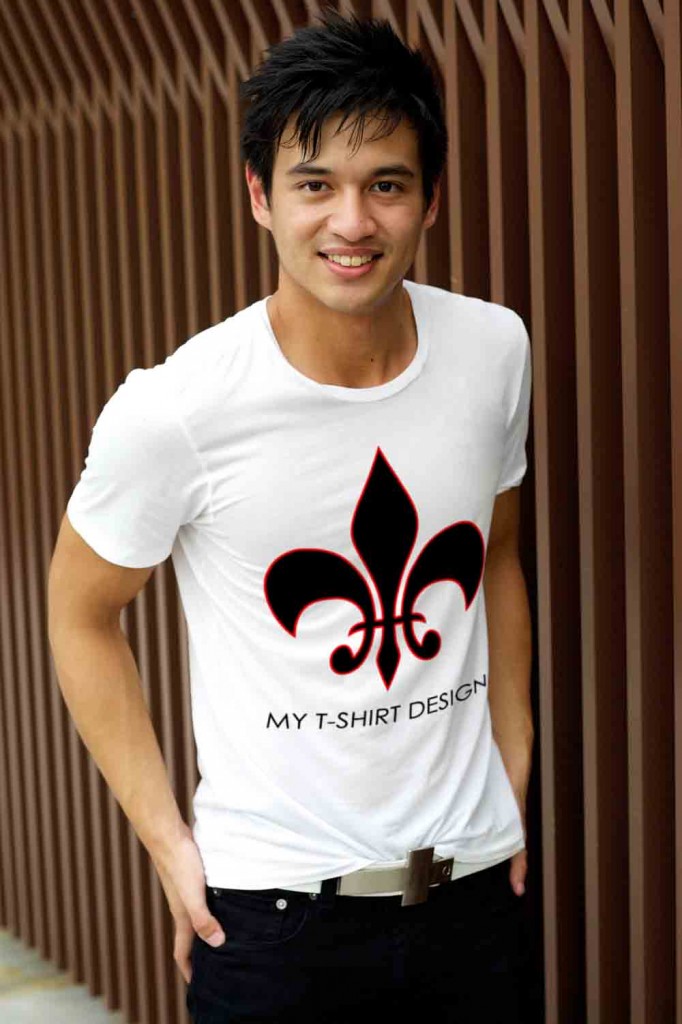
And your T-shirt is done and ready for showcasing!
If your artwork is bigger than the front or overlaps the seams:
Firstly, you might want to check with your printer if they can do such big prints (prints covering most of the shirt), or if they do printing across the sides/seams. Most printers do not, or prefer not to as it is a lot more work. Your cost price of your T-shirts will also rise significantly.
Step 1:
The first step is the same, you need either a plain T-shirt on its own, or a ‘model’ wearing a plain T-shirt. Open that image up in Photoshop. Duplicate it by right-clicking on the layer and Duplicate Layer as a safety measure.

Step 2:
Now, we need to make a selection/outline of the shirt. There are a number of ways to do it, like using the Polygonal/Magnetic Lasso, the Quick Selection Tool, and Magic Wand. I’ll be using the Magic Wand since the shirt is the only source of white pixels here so it’s quick and easy to select the shirt.
Select the Magic Wand Tool. The tolerance basically means how strict you want it to differentiate the pixel values. If you have many shades of white in the background which connect to the shirt (eg sky, or white jeans), it’s better to use a lower tolerance (eg 10 and below) so it will make a better selection (let’s say your whiter T-shirt over a less white jeans. Lower tolerance simply makes the differentiation more ‘picky’ and will select only your T-shirt). However, if there’s just only one source of white in the whole picture like my example, feel free to use a higher tolerance like 35, as it will select most of the white easily and quickly. Tick Contiguous. If you tick it just means it will only select the area you click at and its near surrounding areas, we only want the shirt so that’s a good thing. Unticking it means it will sample and select all pixels of near value in the whole image, like the eyes, or any white in the background.
PS: If you still have troubles choosing which tool, or feel the Magic Wand is too hard to use, you can simply use the Polygonal Lasso Tool (the third icon down the toolbox menu). It works the same as join-the-dots so simply join the dots around your artwork.
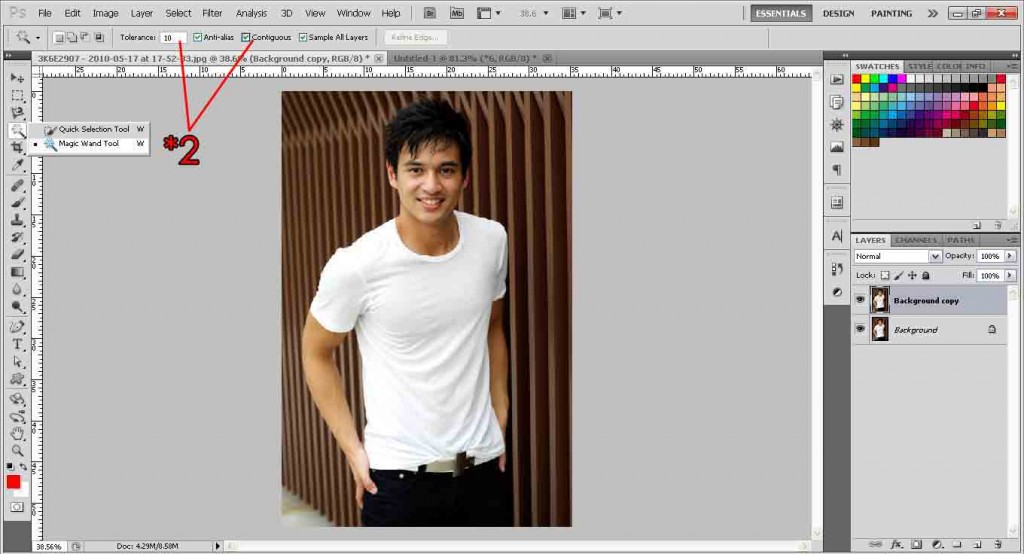
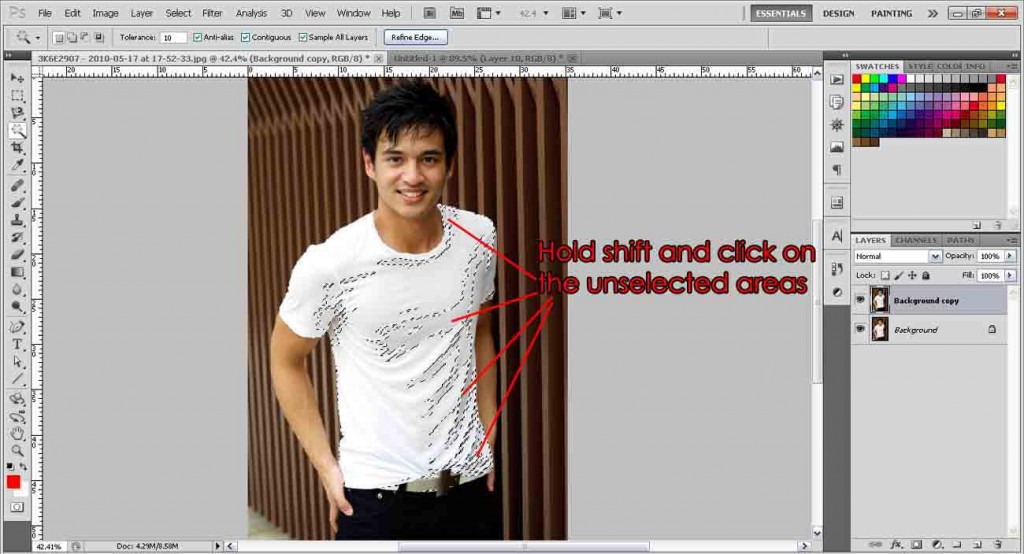
Use the Magic Wand Tool and click on the white spaces in the shirt. Depending on your tolerance level, you might get something like this on your first click, and you notice that not the whole shirt is selected but only parts of the same shade of white you clicked at. Simply hold shift while clicking on the unselected parts. Holding shift simply adds your new selection to the existing selection. Don’t get intimidated at this part, it’s really easy to do. If you don’t know what to do, basically hold shift and click everywhere in the shirt! Seriously.
If you did it correctly you should see this. Make sure there are no dotted selections in the shirt itself.
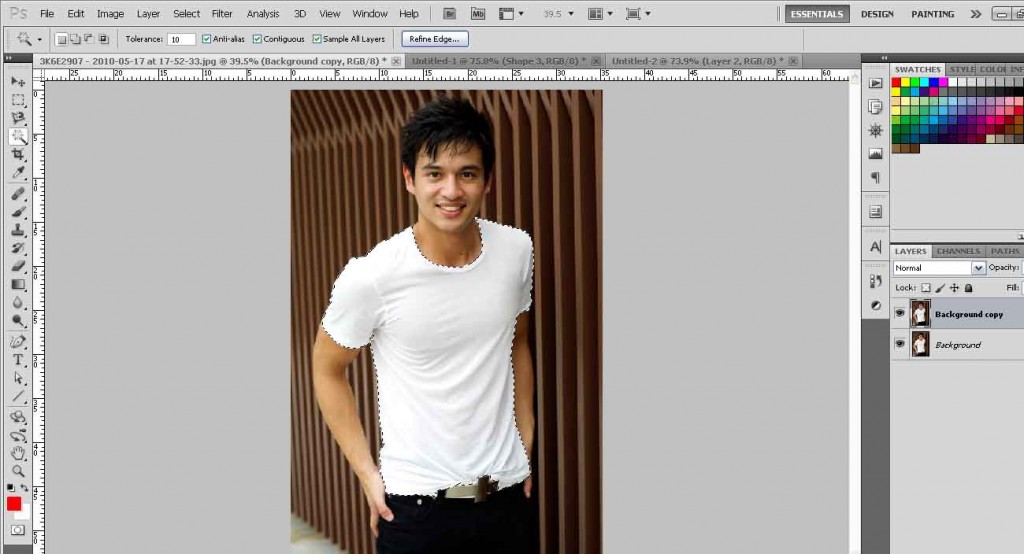
Optional: You can go to the Options Bar: Refine Edge to further refine the edges of your seleciton if needed. Play around with the settings there to see what works best for you. If not, let’s just move on!
Step 3:
Press Ctrl+J (Cmd+J) and this will copy your selection and paste it on a new layer. Duplicate that layer as a safety measure by right-clicking it and “Duplicate Layer”.
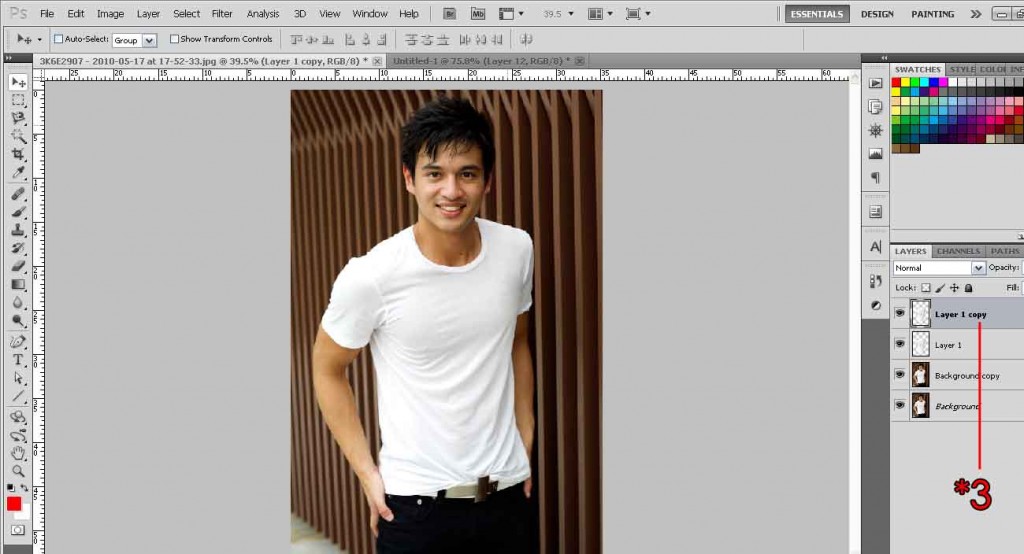
Step 4:
Now we here’s where we bring your artwork in by dragging the file onto the model or shirt, or go to Menu Bar: File > Place > select artwork. Scale your image to the size you want. Hold shift while dragging to keep it in proportion. For this case I’ll be making the artwork alot bigger to overlap the seams.
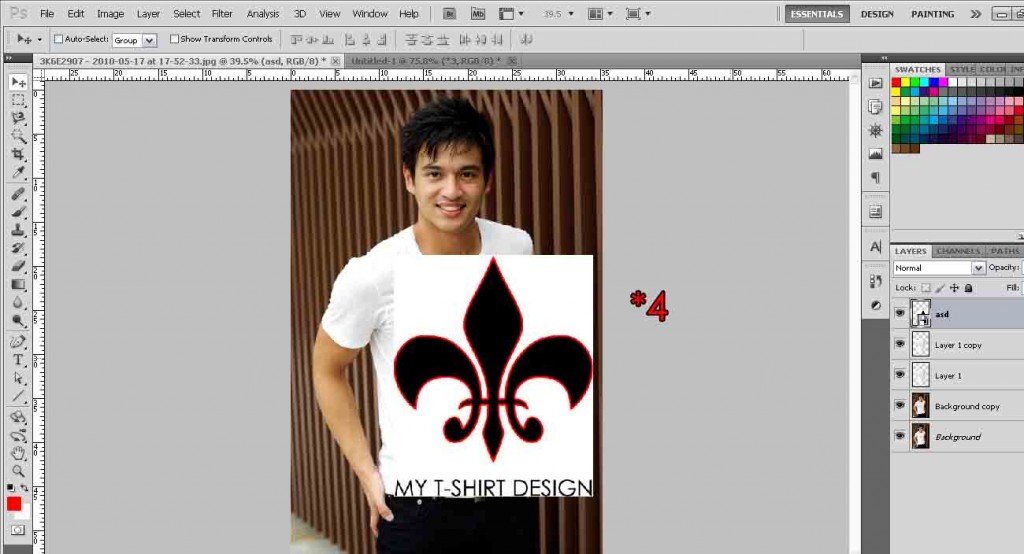
Step 5:
Change the blending mode to Multiply. Note: Multiply only works for dark images on light backgrounds. If you have a bright image on a dark background (eg, a red artwork on a black shirt), you will notice your design will simply turn black, or becomes very dark. For light colors on dark backgrounds, use the Lighten or Screen blending mode. In fact, try out all the different blending modes to see what different effects you get!
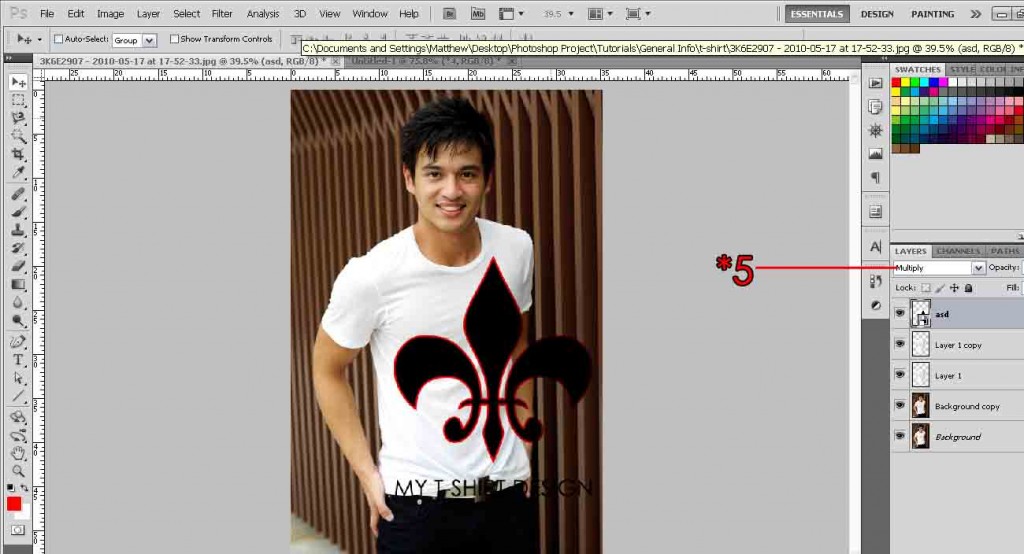
Step 6:
Okay here you need to do exactly what I say, if not you won’t get the same results, so pay attention! Hold Ctrl+left click on the T-shirt selection we did earlier. Remember to click on the icon, not the layer. An outline of the shirt should appear if you did it correctly. Next, select your artwork layer. Lastly, click the Layer Mask button.
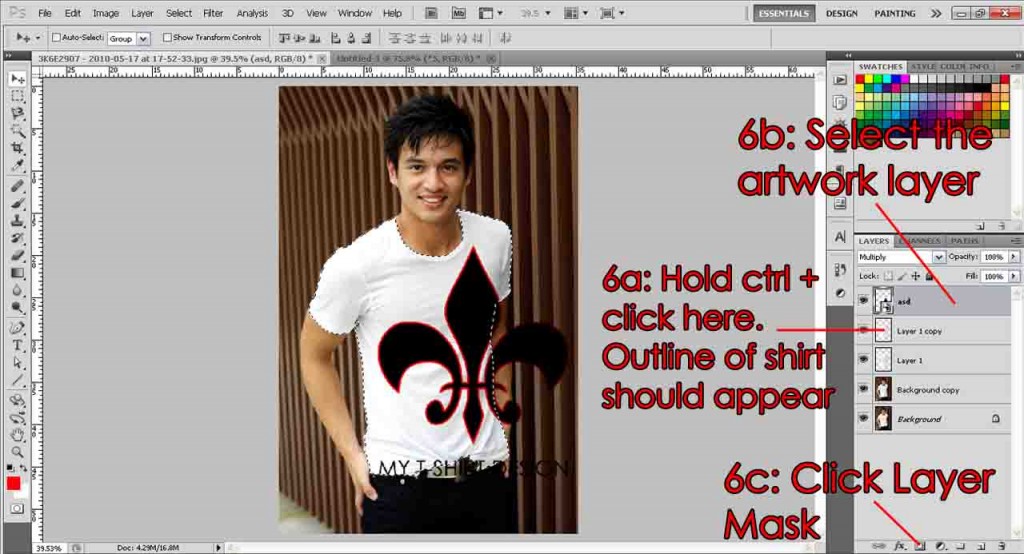
You should see something like that. The artwork is masked by the T-shirt selection we made earlier on.
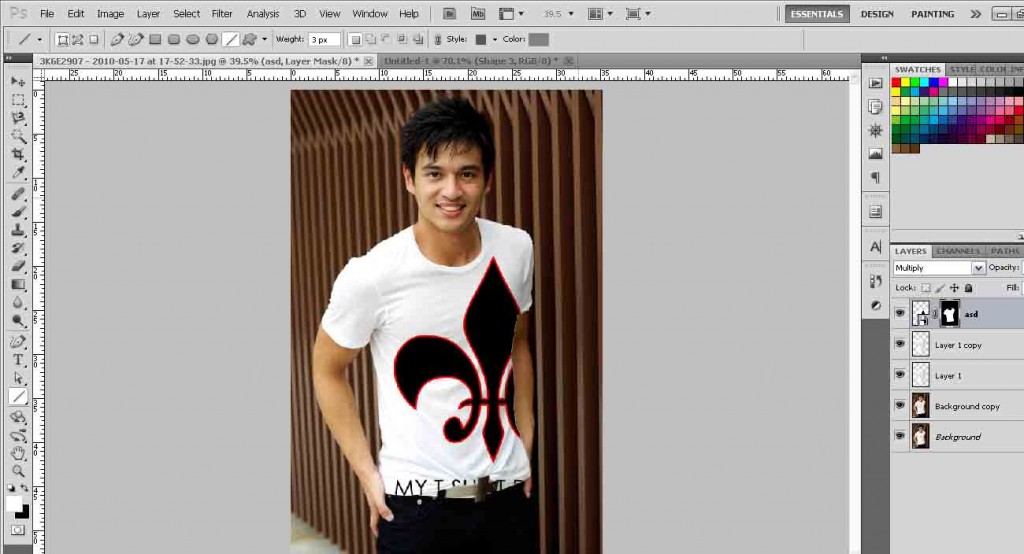
Step 7:
To further edit your picture, if necessary, click on the Lock/Chain button to unlock the layer mask from the artwork. Then click on the artwork. You can now move your artwork around the T-shirt to your preference, and the artwork will still stay constrained within the T-shirt selection itself.
If you don’t click on the artwork first, you’ll find that you will be moving/editing the T-shirt selection instead. If you fail to unlock them, you’ll be moving/editing both the artwork and T-shirt selection.
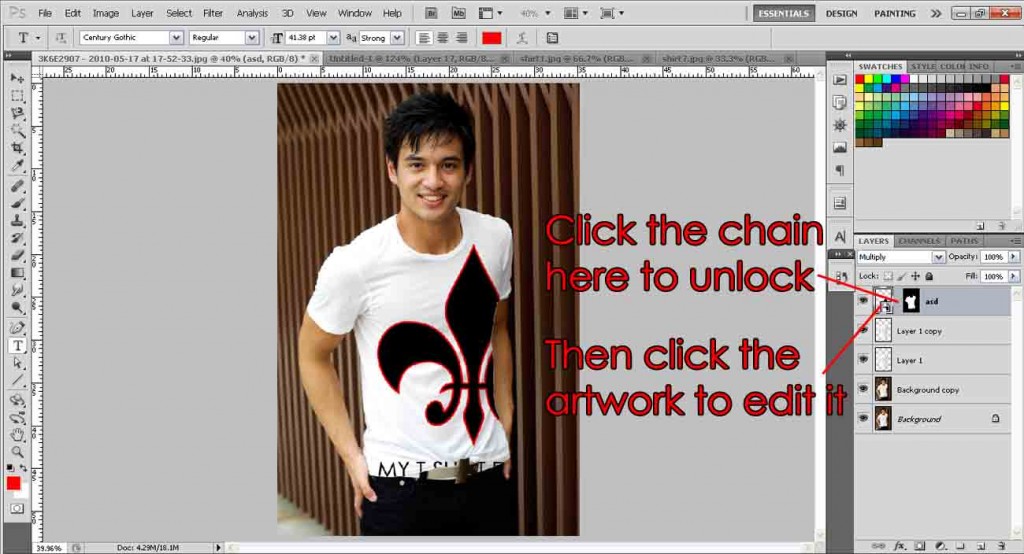
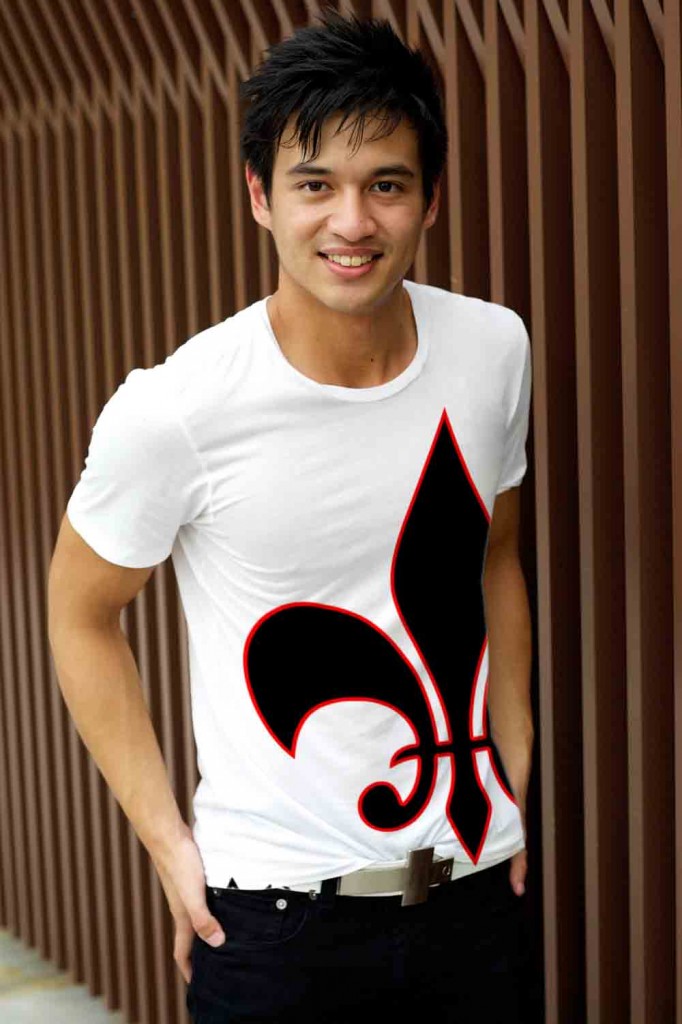
For my example, I’ll put it at the bottom left of the shirt and use the Warp tool and Gaussian Blur to make it look more realistic and natural. (see Step 5 and 6 of the first part of the tutorial to do those)
And the final product.
Need Help With Photoshop or Looking for Professional Support?
Whether you're just getting started with Photoshop or need expert-level assistance, we're here to help! Contact us for personalized Photoshop tutorials, project support, or creative services.
Get in touch today to take your skills or projects to the next level.
CONTACT US NOW📘 Want to Master Photoshop Faster?
🎁 Get Your FREE PDF E-Book "Top 10 Photoshop Tricks Every Designer Must Know" Now – Packed with expert tips, shortcuts, and techniques to boost your creativity & workflow.
👉 Download Your FREE PDF E-Book NOW!


