
In this lesson, you will get to know the interface and layout of Photoshop, and how to execute basic operations.
- Workspace
- Customizing your workspace
- Creating New Documents
- Opening Documents
- Saving Documents, and their various formats
- Undoing Changes
Workspace
The whole space in which you work in Photoshop is called the Workspace. They can be customized to your preference, or you can select an available preset theme.

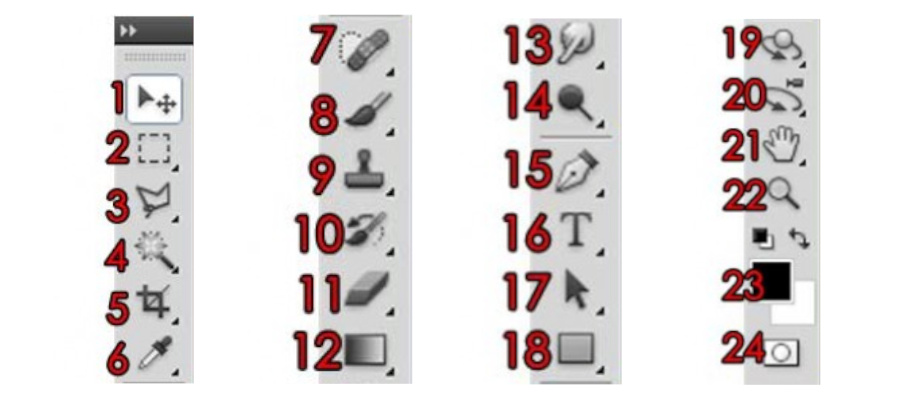
Menu Bar – Contains various options for all the software’s options
Options Bar – The options bar sits beneath the menu bar and holds options for different tools.
Toolbox – Contains shortcuts to Photoshop tools. More information here.
Panel Dock – Where palettes are located and can be customized to your preference.
Palettes – Individual “panes” that hold information or options for working with your file, known as palettes (or panels), float on the right-hand side. Each palette is labeled with a tab, and can be minimized, closed, grouped with other palettes, or dragged in and out of a panel dock. In the example above, the palette shown is Swatches, and is a library of swatches (or colors), simply nothing more than a color reference.
Canvas – The canvas, or document window, is basically where you do your artwork or editing. The canvas will always bind the image, so if the image is too big, it will get cut off, and you will need to adjust the canvas size accordingly.
Status Bar – Below the canvas lies the status bar at the bottom left. It’s just an easy way to see useful information about your file, like zoom percentage, dimensions, resolution, etc. See the small black arrowhead on the right of the status bar? Click that to choose what type of information you want to be shown.
Layers – Layers are a very powerful feature in photoshop, they allow you select and edit an image without touching the rest of the layers, or images. It is critical that you get to know them quickly, as they really will frustrate users with simple problems (like why is image A covering B and I can’t get it the other way round?) if one does not understand how layers work. Hence I have made a whole guide just on layers, click here for more info.
Customizing your workspace
About everything you see in the workspace is customizable, and draggable. Move palettes and toolbox to your liking, or show/hide various palettes that you desire. Everything can be found under the ‘Window’ option, at the menu bar. To make a new workspace, simply go Window > Workspace > New workspace. Label it and arrange to your preference.
Ok I’m good to go, what now? Time to create a new document!
Creating New Documents
You can create a new document by going to File > New from the menu bar, or pressing Ctrl+N or Cmd+N.
Specify the dimensions (width, height) in your desired unit (pixels, cm, etc). It’s good to know the dimensions if you’re working for a specific document, for eg if you’re making a website banner, the standard size is usually 468×60 px, or a name card, etc. If you don’t really have any specific measurements in mind, don’t worry about it just use a preset them or enter some numbers you think might fit. You can always change the image/canvas size on the go from the menu bar Image > Image Size or Canvas Size.

Resolution is usually 72 as default. Basically the higher the resolution, the higher quality your file will be. However, the size will increase significantly too. If you just need readability and don’t need top quality, for eg, files for emails / brochures / pdfs, then 72 will do just fine. If you are doing prints like name cards, T-shirts, and other design related prints, then use a higher resolution. For myself, I usually use 300 pixels/inch.
Color mode, using RGB is the norm in most cases, unless you need to work in grayscale or CMYK. For example, some print companies only want your artwork in CMYK format.
Background contents, here you can change the default background to white, a background color, or transparent.
If you look at the Preset, you can drop down the menu to reveal more commonly used templates for you to use. If you commonly use your own custom settings, it would be a good idea for you to “Save Preset” and label your own settings, so it will appear in the Preset drop down menu next time for you to use.
Opening Documents
Simply go to the Menu Bar: File > Open > Document Name, or press Ctrl+O or Cmd+O.
Saving Documents
Okay so you’ve finished your artwork. Now how do you transform it into a picture? First off, you might want to get into the habit of constantly saving your work as you progress, as sometimes unforeseen things might happen, power outage, laptop battery dies, PC hangs, etc. Go to Menu Bar: File > Save and select the type the name of your file. It should save it as a PSD format by default.
When you’re ready to produce the final product, go to Menu Bar: File > Save As. Type the file name, and choose the format. Here you can see the many formats that you can save in, each having its own unique properties. I’ll go through the more common ones.

Photoshop File (.psd, .pdd, .eps)
This format preserves the information in all the layers. If you’re going to continue working with a picture, this is the best format to use. File size can be quite large, however. Note: It is advisable to save your work in the most up to date Photoshop format available. For example: if you have Photoshop CS and are sent a Photoshop 7 file, you should save it as a Photoshop CS file to preserve any elements that may not be supported by Photoshop 7.
.jpg, .jpeg .jpe
The most commonly used format for most pictures. This format compresses the images, so that information (details and colour subtleties) are lost. You can choose how much you want to compress the image. Good format for use on the web. Small file sizes. Millions of colours.
tif, .tiff
Common in use with early scanners. Will produce high quality images, but very large files. Not for use on the web. Great format to send to your printers for printing, eg T-shirts and flyers, etc.
.gif
Pronounced both “Gif” and “Jif”, this file is one of the most popular for web graphics as it loads quickly. 8 bit format (256 colours max.). It has possibilities for transparent colour and animation.
.png
New format for use on the web that is intended to replace both gif and jpeg. Compressed, millions of colours, transparencies. It compress in a different way than jpeg, and has advanced possibilities, such as alpha channel (opaque or partly transparent colours). In 8 bit (256 colours) mode it compresses better than gif. This format is what you want to use for most web stuff like buttons as they support transparency.
.bmp
Windows bitmapped image. Used by Microsoft Windows applications. Good quality, large file size. Not for use on the web.
.pcx
Older general purpose format. Practically obsolete now. Not for use on the web.
Portable Document File. The famous Adobe’s file system that allows electronic cross platform sharing of documents.
So what’s the best format?
If your graphics are intended for web publication and has a lot of lines, vectors, or drawings which contain a lot of single colour then use gif. The reason being you want the size of your images to be as small as possible so that your website loads up quickly.
If your images has a lot of color then use jpeg. This is because gif format has a limited range of colors, although a smaller file size too.
If you need to have transparency, such as using an image for a button on your website, use gif or png.
For print jobs, like T-shirts, name cards, flyers, etc, use the highest quality possible, so use TIF, TIFF format. Jpeg and png are fine too, as long as the resolution is high enough. Check with your printer for more information, some may require that you submit in other formats even, such as ai (Adobe Illustrator).
Undoing changes

I know this is a weird place to suddenly write about the history palette, but one of my frustrations when first using Photoshop was trying to learn how to undo stuff, so I figure I would write this in right at the start to spare you the pain.
The History palette (Menu Bar: Window > History) is your life-saver in photoshop, it simply lists all your steps or edits that you’ve made, allowing you to jump back to any state that you want. You can set the number of steps that are stored in the memory by selecting Menu Bar: Edit > Preferences > Performance (Photoshop > Preferences > Performance on a Mac) and changing the value in the History States text box.
Alternatively you can uses these shortcuts:
- Ctrl-Z (Command-Z on a Mac) lets you undo and redo the previous step.
- Ctrl-Alt-Z (Command-Option-Z) steps back through the History palette.
- Shift-Alt-Z (Shift-Option-Z) steps forward through the History palette.